Monday, July 7, 2014

Big Curves PTU

I wrote this Tutorial, any resemblance to others is purely a coincidence.
Please DO NOT add this to any Website, Forum or Group, with out my permission.
The art work I am using is by Jennifer Janesko and can be found Here
This Beautiful kit is called " Big Curves", by Cari at Black Widow Creationz and can be found Here
Drop shadow = DS = 2,2,50,5 black
Let's Begin
900 X 900
1.) EL 17 -- copy and paste = C&P as new raster Layer = Nrl -- place in center - Tag reference = Tr -move it over to the left slightly-
2.) Paper 7 ( or one of your choice ) with magic wand click on the inside of  frame = sel. - modify - expand 6
C&P paper as NRL and place it over frame -- invert and delete on paper -- DS both-- if you need to crop opaque then do so, now
3.) Tube of choice -C&P as Nrl - Resize = R - if needed -place her below frame - duplicate = Dup. - Blur Gaussian 6 = Blend mode = BM = multiply - opacity - Opa. = 90% --Merge down = MD -- and DS & TR
4.) EL. 15 -C&P as Nrl - place below tube layer inside of frame-- DS & TR
5.) EL. 22 - C&P as Nrl --place above the hearts but below the tube -DS & TR  close bottom layer - and Merge Visible = MV all layers-- rename - Frame --keep bottom closed
6.) EL. 9 - C&P as Nr -place behind frame - DS & TR-- Dup. --mirror --MD
7.) EL. 3 -- C&P as Nrl - place on top of rainbow --DS & TR --Dup. - Mirror - and Flip -- move to bottom of frame -- TR - MD
8.) EL.28 - R = 60% Sharpen - un -sharp mask = Usm - C&P as Nrl -lace on lower left side.
9.) EL. 9 -- R = 60% Usm - C&P as Nrl - place bottom right of frame -- DS & TR
10.) EL. 26 -- R = 60% USM -- C&P as Nrl - place on left side center -- move below frame layer --DS
11.) EL. 11 --C&P as Nrl - place on bottom center -- move below frame -- NO DS
12.) EL. 10 -- C&P as Nrl - place on bottom center --move to where the top of heart is under the frame -- DS & TR
13.) EL. 28 -C&P as Nrl - place on bottom layer -- DS -Dup.- mirror - flip - MD -- TR
14.) EL. 30 -C&P as Nrl - place on bottom right corner -- DS & TR
15.) EL. 31 -R= 50% - USM-- C&P as Nrl - place next to shoes -- DS
16.) EL. 7 - C&P as Nrl -- place on top right move to top of frame -- DS - free rotate 90 % right -- DS & TR
17.) EL 37 - R = 60%--USM --C&P as Nrl - place on bottom left -- DS & TR
18.) EL. 38--C&P as Nrl -place on bottom of tag -- Dup. - R = 60 % - USM and place it on bottom..DS & TR
19.) EL. 21 - R = 75% = USM -- C&P as Nrl - place it on left top side - move layer below frame. -- DS &TR 
20.) EL. 34 - R = 50% & 80% -- USM -  C&P as Nrl - place it in front and move layer above the back ground -- free rotate 90 right -- DS & TR
21.) EL. 33 - repeat #20
22.) EL. 35 - R = 60% -- USM -- C&P as Nrl =lace right side of shoe -- DS & TR
23.) EL. 32 - R = 60% - USM - C&P as Nrl - place left of perfume bottle -- DS & TR
24.) EL. 2 R - 50% & 80% X2-- USM - place on top right corner -- DS & TR --Dup. --place on center frame - mirror - free rotate left 25
26.) With bottom still closed - MV. all layers -R = 56% = 504 X 504- Sharpen - (Xero - porcelain - Optional )
27.) Paper 10 ( or your choice ) - C&P as Nrl -
add mask of choice- delete mask and ungroup layers - TR
28.) Open bottom layer -- MV all layers -- now add all Copy right info and Name.
Thank you for putting up with my wrantings, I would love to see what you did with my tut-- so if you'd please let me know - I would so much appreciate it.
Hugs
Angie


Friday, July 4, 2014

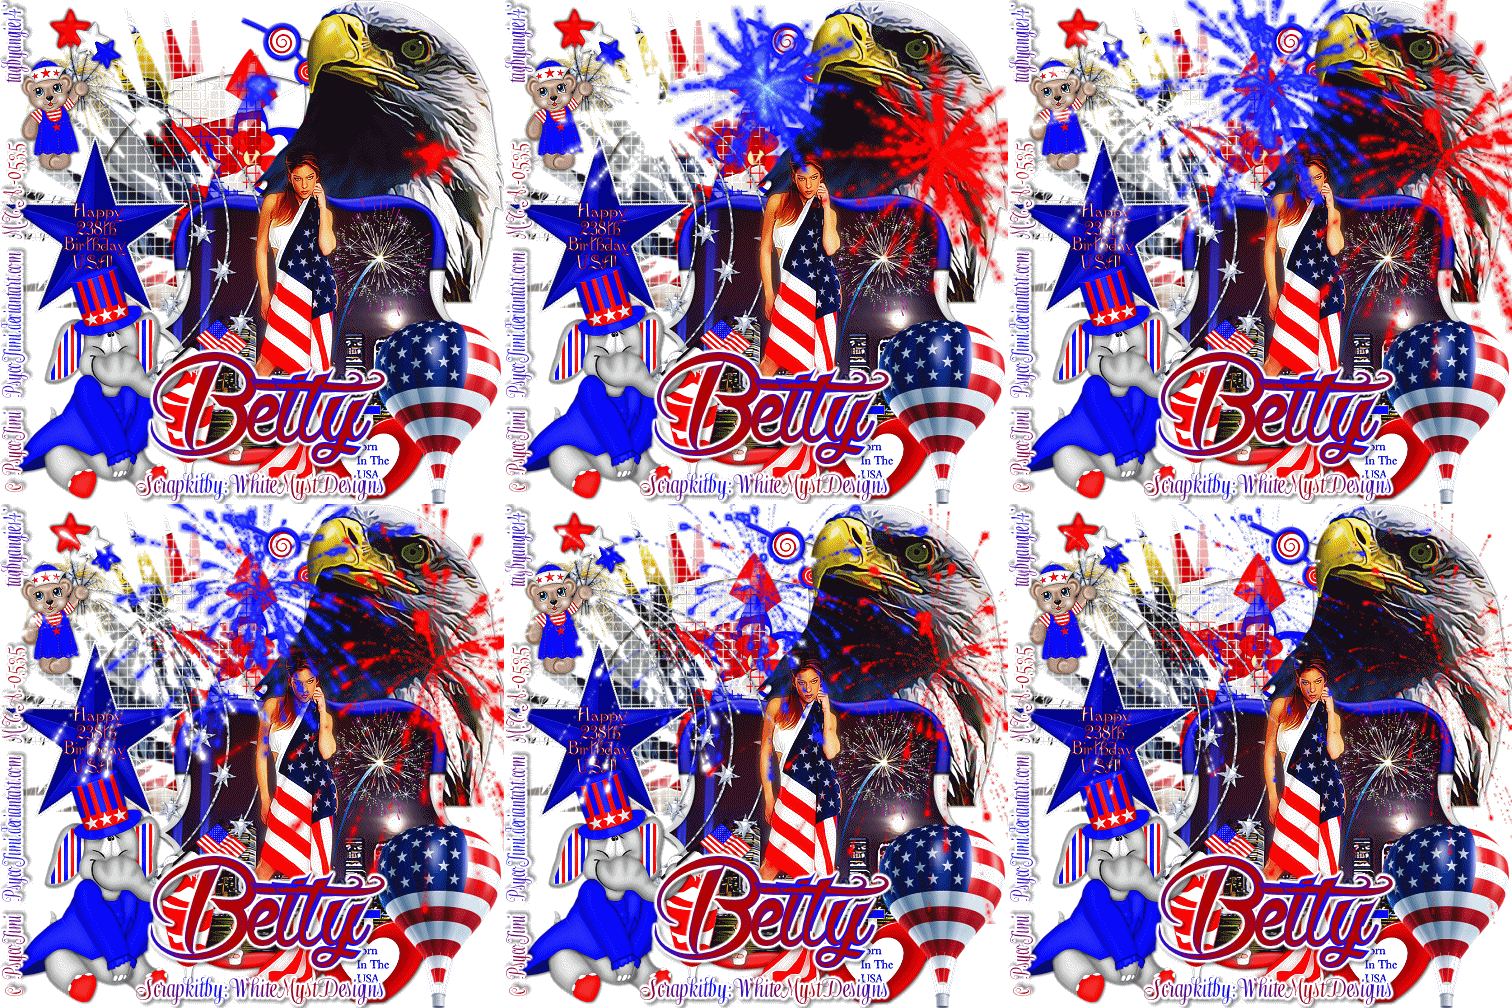
USA PTU

I wrote this Tutorial , any resemblance to others is purely a coincidence.
Please DO NOT add this to any Website, Forum or Group, without my permission.
The tubes I am using are from Psyco Jimi and you can find his art Here
This awesome 4th of July scrap kit is by Betty at White Myst Designs and can be found Here
Vix Mask 143 found Here
3 or 4 Tubes
Animation found Here
Drop Shadow = DS = 2,2, 50, 5 black
Let's Begin
900 X 900
1.) Frame - Copy and Paste = C&P as new raster layer = Nrl - place in center -- with magic wand - click on the inside of frame.. selection - modify - expand 6
2.) Background tube - C&P as Nrl and place it in center of frame-- invert and delete-- move below frame.. now close off
3.) with magic wand click on the inside frame again -- Paper of choice -- I used paper 1-- invert and delete--DS on all 3 -now with bottom closed Merge Visible = MV = all layers.. rename frame
4.) #2 tube - C&P as Nrl -- move to left top -- move layer below frame layer -- add mask to this one -- Vix 143
5.) #3 tube -C&P as Nrl- mirror- place on right side - move layer below frame --DS -- Tag reference = Tr
6.) Elephant with flag -C&P as Nrl - place on left bottom -- DS -- Tr
7.) Firework 2-- C&P as Nrl - place on city in frame -- DS -- Tr
8.) Firework -- mirror -- C&P as Nrl -- place on top left side -DS -- Tr
9.) Main Tube --C&P as Nrl -- and place on front of frame-- top layer -- duplicate -blur-Gaussian -6 - blend mode = hard light - opacity = 90% -- Merge Down -- DS -- Tr
10.) Flower 2 --C&P as Nrl -- Place it on right bottom -- DS -- Tr -- make sure it's placed above bottom layer.
11.) 4th of July Balloon-- Resize - R = 50 % unsharp mask = Usm - C&P as Nrl place on bottom right--DS -- Tr-
12.) Heart bottle - R =50% -Usm -C&P as Nrl - place bottom left -- DS --- Tr
13.) Lil Patriot - R = 50% - Usm - C&P as Nrl - place on top left - DS --Tr
14.) Milk Shake -- R = 50% Usm -  C&P as Nrl  - place next to Ellie and move layer right below Ellie's -- DS -- Tr -- in your material palettes -- B/ b20000   F/ White -- 24 size --Stroke = 1-- space it between the 2 sides -- EX. 1
Write any thing you want. I wrote " Happy 238th Birthday, USA " EX.2
When Happy Merge Visible -- R = 75% Usm-- C&P as Nrl -- place left side center--move layer right below Ellie -- DS -- Tr
16.) Now that we're done and happy with your tag.. MV. all layers -- Resize 56% = 504 X 504 -- sharpen --
17.) Add all Copy right info and your name... save as PNG.
now if you want to animate, just keep following..
Animation
1.) Open Animation Shop
2.) Open all the fireworks you want to use, the ones I used had 15 frames.. so here is what I did..
3.) Copy tag and go over to AS -- paste as a new animation-- now duplicate tag 14 X's which will give you 15 frames--
4.) Select 1st frame and make it active --select all -propagate paste - open one of your fireworks - select all -- paste into current frame. now if you want to do 2 or more fireworks.. all you need to do is select all -- and paste into selected frames..As long as you don't mess with the settings --if you do all you have to do is reset the 2nd setting in Propagte paste.. Have fun -- when your done ==go to animations - animation property -- opaque -- white -- and then Frame properties -- 20
when Happy save as GIF..
thanks for putting up with this,lol
hugs
Angie
 
 
Not Animated


Tuesday, June 24, 2014

January PTU

I wrote this Tutorial, any resemblance to others is purely a coincidence. Please do NOT add this to any Website, Forum or Group , without my permission.
The cute little tube is by Elizabeth Austin and can be bought Here 
The scrapkit I am using is by Betty at White Myst Designs and can be found Here 
and is called " January "
My Supplies  Here 
Scroll down to : Color Replace
Filters = Eye Candy 4000 -- Gradient Glow
Let's Begin
Drop Shadow = DS = 2,2,50,5 black
900 X 900
1.) Stamped frame -- Copy & Paste = C&P as New Raster Layer = NRL place in center.
2.) With Magic Wand -- click inside each frame--selections-modify=expand X 6
3.) P 8 =I changed my color - to look more like the color of my tube-- if you don't know how to change the color, (in my supplies) here is how I did it EX.1  -- now invert on frame and delete on paper-- crop opaque if needed - select none --DS both, move paper below frame-
4.) Tube - Resize = R = if needed .  Duplicate = dup.
Blur- Gaussian 6 -- blend mode = Hard Light -- Opacity 100%---Merge Down = MD -- dup. this tube- move layer below frame, with lasso tool - point to point - add shift -- feather = 1- smoothing = 0 anti - alias - checked. go around the foot over hanging on the left side - add DS to dup. -- tag reference = TR
5.) Banner - R = 50% - unsharp mask = USM - C&P as NRL--free rotate left 50 -- DS --Place under frame--
6.) Banner flag- C&P as NRL--place it on top left side -DS-- dup.- mirror and fix together where it looks good, when happy - MD- make sure the layer is above background layer.. TR - crop - opaque
7.) Balloons - R.= 50% X2 & 75% X2-- USM - C&P as NRL- mirror and place it on bottom right- dup. and R = 80 % X 2 - mirror and place on top left -- TR -- move layer below tube layer
8.) Candle -R = 50% -USM -C&P as NRL-  place on left side bottom- DS -- dup.- R = 80% -place next to other candle -- dup. -- R= 80% place on other side of candle. TR -MD all 3 layers
9.) Credit Card -- with selection tool--rectangle -- add shift -- feather = 0 - anti-alias = Checked-- Gradients- forground-background - F = B0253D - B = D47583-- Angle = 110 --repeats- o -- Linear-when done -- Merge Visible - C&P as NRL- place bottom center, move layer right above bottom..DS & TR
10.) Corset -- R = 75 % X 3 -- USM - C&P as NRL- 
place on upper right corner--DS -- TR
11.) Doodle -C&P as NRL- free rotate 90Left place on bottom left center - DS -- dup. - mirror - make sure it in the center of right--MD--TR
12.) Fan - R = 75% --USM -- C&P as NRL- place on top center -- DS -- TR
13.) Flower 3 -  R= 75% X2 USM--C&P as NRL-  Place on right side under the banner inside the frame-- DS -- TR
14.) Flower 2 - R= 50% & 80% X 2 -- USM -C&P as NRL- - place on center top --DS== TR-- free rotate 30 Right -- dup. it a few times I did 5 more
15.) Cupcake -- R -50%-USM-C&P as NRL- - place on bottom right DS --TR
16.)Gift Box -- R = 50% X2 -USM -C&P as NRL-  place on left center -- DS- TR
17.) groovy DOODLE -C&P as NRL- flip-place on bottom right- move layer right above bottom layer--DS - dup. - mirror -- flip- MD
18.) Heart-- R = 50% X 2 - USM - C&P as NRL-Place on bottom right -DS -TR--dup. - Mirror - TR
19.) Butterfly -- R --50% X 2 - USM - C&P as NRL- place on center of frame- move layer below fan layer-- DS - TR - dup. - move this layer below dup. tube-- place butterfly on top of credit card.- TR
20.) Butterfly 2 -- R = 50% & 80% USM--C&P as NRL-  place on top left corner -- EYE CANDY 4000-Glow 3--fat --DS -- TR -- dup. R = 80% - place on bottom right corner -- TR
21.) R= 56% - USM-- add paper 1 ( or one of your choice) Place right above bottom -- add mask of choice -- delete mask and ungroup layers -- crop -- opaque -504 X 504 when happy Merge visible all layers and add All Copy rights and Name..
Thank you for staying with me so far..
hugs
Angie

Sunday, June 8, 2014

Ms America PTU


I wrote this Tutorial, any resemblance to others is purely a coincidence. Please do NOT add this to any Website, Group or Forum.
The art-work I am using is by Elizabeth Austin and you can buy it Here
The Awesome Patriotic scrap kit is called " Ms. America " by Black Widow Creationz and can be found Here
My Supplies Here
Drop Shadow = DS = 2,2,50,5,black
Let's begin
900 X 900
1.) EL. 32 - Copy and Paste  = C&P -- as New Raster Layer = NRL --Place in center.
2.) With Magic Wand - click in center of frame - selection - modify - expand X6 - add NRL - and flood fill with black- move layer below frame.
3.) EL. 7 - C&P as NRL -place below frame - do NOT DS - adjust-- add remove noise - add noise -Gaussian - 45 -- monochrome Checked-- ok
4.) Tube - C&P as NRL-- place on top of frame - duplicate- blur- Gaussian X 6 - blend mode = soft light - opacity = 90% - merge down - Tag reference = TR. - duplicate- move this below frame - working on top one, erase the parts that are over the frame- EX. 1 & 2-- when happy DS bottom tube layer
5.) EL.12-Resize = R = 80% X 2 - sharpen - Unsharp mask = USM - C&P as NRL-- place on upper left corner -- DS - TR
6.) EX. 10 - C&P as NRL-- place on left - move layer below flag layer - DS -- TR
7.) EL. 13 -R = 70 % and 80% -- USM -C&P as NRL-- place on upper right corner - DS - TR
8.)  EL. 2 - R = 80% USM -C&P as NRL-- place on bottom right - DS - TR
9.) EL 21 - R = 70 % USM - C&P as NRL-- place next to drink -- DS - dup. -- R = 80% - place next to other.
10.) EL. 23 - R = 60% & 80  % X 2 - USM -C&P as NRL-- place on left bottom - dup. move layer below original- MD-  TR
11.) EL. 1- R = 90% - sharpen -C&P as NRL--  place on bottom right, - move layer below cupcake layer - DS - TR
12.) EL. 16 - R = 90% X 2- USM -C&P as NRL--  place next to boots - DS --Dup. = R = 80% - place on right center -- TR --free rotate = right 30
13.) EL. 17 - R = 50% - USM - C&P as NRL-- Place it lower left above the red star - free rotate -- right 30 -- DS - TR --Dup. R = 80% - mirror - place it on right side -- TR
14.) EL. 19 - R = 60% & 80% USM -- C&P as NRL--  place on center bottom -- DS -- TR
15.) EL. 26 - C&P as NRL--  place center -- DS-- move layer right above bottom layer
16.) EL. 27 - R = 60% USM --C&P as NRL-- Place on top left -- free rotate  - left 60 - DS - TR - move layer to right above bottom hearts.
17.) EL. 24 - R = 60 % USM --C&P as NRL-- place left center above the boots- DS - TR
18.) EL. 4 - C&P as NRL--  put on right bottom = DS -
19.) Wic. -C&P as NRL--  place below the rocket - TR-- No need to DS.
20.) EL. 30 - R = 50% & 80 % -- USM - C&P as NRL-- place on right side of lipstick -- DS -- TR - dup. - mirror- move this one below lipstick - TR
21.) Make sure bottom layer is closed.. - Now Merge Visible all other layers -- R - 56% = 504 X 504 -- sharpen -
22.) Paper of choice - C&P as NRL-- above bottom layer-- add mask of choice and then delete mask -- and ungroup layers -- when this is done don't forget to crop -- opaque - 504 X 504
23.) open bottom layer and then merge visible all other layers-- add all CR info.. and your name.. if you don't want to animate than save this as Png.
now lets animate..
24.) Open Animation shop -- copy tag -- and then paste into animation shop as new Animation -- now you want to duplicate this layer =  4 X's = 5 frames --
25.) Open fireworks ( if you recognize this FW animation, please let me know , and I will give you credit .. thank you)
click on the 1st frame -- select all - copy
Now go to your frame ones, clicking on the 1st frame-- select all -- Propagate Paste-- and paste into selection -- your fireworks should be in all the frames-- you can keep adding more FW by just repeating - paste into selection ( make sure all frames are still active, you don't want it to have a spasm...) -- with all frames still active go to animation properties - opaque - white and with the frames still active change your frame properties to -- 20-- after viewing and your done save as GIF ,you want your animation to work.. good luck and I hope you could understand this.
hugs
Angie
 
Png Version


Friday, May 30, 2014

Darkangel PTU

I wrote this Tutorial, any resemblance to others is purely a coincidence. Please do not add this to any Blog, Forum, Group, etc. without my permission.
The Tube I am Using is by : Jennifer Janesko and you can find them Here
The kit I am using is called " Darkangel" and is by Cari at Black Widow Creationz and can be found Here
Let's Begin
900 X 900
Drop Shadow = DS = 2,2,50, black 5
1.) EL.30 - Resize = R-80%- Sharpen = Unsharp Mask = USM
Copy and Paste = C & P -- New Raster Layer = NRL
now go to Rotate clockwise--90% - with magic wand- click inside all spaces
2.) Selection - modify - expand 3-- paper 10 ( or one of choice) invert on frame and delete on paper-select none = SN - . move paper below frame. DS both.
3.) With magic wand click inside of top square (Sq) -sel - mod-ex3 -add a piece of the tube - invert - delete - SN - move layer below frame - DS-
4.) Repeat #3 for all other Sq.'s -- don't forget to Crop Opaque the bottom 2 sq.'s - when done - close bottom layer and Merge Visible = MV - all layers.. then free rotate left - 45% - rename = frame - move up a little and over to the left- Tag Reference = TR
5.) EL. 10 - C&P as NRL- Place on upper right -- DS & TR
6.) EL. 13 - - C&P as NRL- place on bottom right -- DS & TR
7.) EL. 20 - R = 75% X2 --USM--Mirror-- C&P as NRL- place on left bottom - duplicate = dup.- blur - Gaussian 6-- blend mode = dodge - opacity = 100 - merge down - MD
8.) EL. 2--- C&P as NRL- place middle left center - DS -TR- dup. & mirror - move down
9.) Tube - C&P as NRL- place on bottom Left side- dup.- blur- Gaussian x6 - Blend mode- soft light - opacity = 80 % - MD- DS - move  layer below Cat layer
10.) El.23 --C&P as NRL- place on right side - DS - move layer below other tree -TR
11.)-EL. 39 --C&P as NRL- place on top right -DS -dup.-mirror- move next to other - make both about 1 sq. from set of canvas - TR --MD -- mover  layer on top of bottom layer
12.) EL. 27 -C&P as NRL-R = 75% X2- USM- move layer right above the chain layer ( second from Bottom)  DS - move up a little - TR
13.) EL. 9- R= 75% -USM -C&P as NRL-place on top left - DS & TR
14.) EL. 16 --C&P as NRL- place upper center-move layer above city skyline--DS & TR  
15.) EL. 36 -R - 55% & 75% -USM - mirror ---C&P as NRL- place on right side of tube- DS&TR
16.) EL. 19-R = 50% & 75% --USM --C&P as NRL-place on right side bottom - DS & TR-mirror -dup. - R = 80% - sharpen -place next to 1st one- dup. & mirror- I repeated this a few more times. TR
17.) EL. 42 --R =60% & 80%  X2-- USM --C&P as NRL-place near Roses on right bottom.- DS
18.) EL. 5--R = 60% USM---C&P as NRL- place on bottom right - move layer below roses -- DS & TR- dup. - R -80% place next to other--TR
19.) EL. 3 -R=60% -USM ---C&P as NRL- place on 4th frame - DS & TR
20.) EL. 11 -- R=50% USM-C&P as NRL-place on bottom right of tube -DS & TR -- dup. - R = 80% -sharpen --move to center left -TR - dup. 1 more X -mirror
21.) MV. all layers - R=56% =504X504 - sharpen --add paper of choice - I used P1. -- add mask of choice -delete mask and ungroup layers - crop opaque
22.) EL. 41 - R =60% X3 - USM ---C&P as NRL-place on right-dup.-mirror -- dup. - move to almost center - and move down -- TR.
23.) Open bottom layer- and MV all layers--
Add all Copy RIghts and Name - save as png.
Thank you all for following my tut.
Angie


Saturday, May 24, 2014

Sweet as Honey PTU


I wrote this Tutorial and any resemblance to others is purely a coincidence. This cute scrap kit is called " Sweet as Honey" it is by Betty at Whitemyst Designs Here
The cute tubes are by Elizabeth Austin and you can buy them Here
You will need 4-5 tubes,
900 X 900
Drop Shadow - = DS = 2,2,50,5 black
Let's Begin
1.) Film Frame- Copy and Paste = C & P -- New Raster Layer = NRL . Place it in the center of canvas. With Magic wand click inside each squares.--Selection - modify - Expand X 6
2.) Paper 7 ( or 1 of your choice) - C&P as NRL-invert on frame and delete on paper. Select None= SN.-- DS both
3.) With magic wand click inside frame 1-selection-modify-Ex.6 - C&P tube as NRL, place over the frame that is active, invert on frame--delete on tube--SN-- DS tube and move below frame and above paper
4.) Repeat #3 for the next couple of frames, add tubes...-- DS on tubes. Close bottom layer and Merge Visible all layers-- keep bottom closed, rename merged layer-- as--" Frame "-- move it up a little.
5.) Flower - C&P as NRL -place below frame layer --DS- duplicate = dup. -- mirror and merge Down = MD.
6.) Circle frame -C&P as NRL-place on bottom layer - with magic wand click inside center of frame -- sel.-mod.-expand X6 -- add paper of choice - I used P8- invert on frame and delete on paper -- SN - DS - both - tag reference = TR.
7.) Apple With Worm - Resize = R -- 75% sharpen= unsharp mask = USM --C&P as NRL- place on bottom left - DS- TR
8.) Balloons - R = 40% - USM-C&P as NRL- place on center bottom- DS - place layer below Apple layer. -- TR
9.) Cupcake -R= 80% X2 -- USM --C&P as NRL-place on right side of canvas, at the bottom -- DS -- TR
 
10.) Tube - R- if needed--  C&P as NRL -place  next to cupcake -- DS -- TR
11.) Tube - R- if needed - C&P as NRL-- place on left side center-- DS -- TR
12.) Dozen Roses R = 75% X3-- USM-C&P as NRL-place on middle bottom of canvas. -- DS--TR
13.) Star Lights- R = 80% -- sharpen --C&P as NRL - place on top center -- DS -- TR
14.)Tree with hearts-C&P as NRL --place on right side top-- move layer below frame layer -- DS -- TR
15.) Light Effects -- C&P as NRL --leave it where it is..--DS--TR
16.) Ric Rac Ribbon -C&P as NRL-- place it on top of bottom frame-move layer right above the 2nd frame -- DS -- TR
17.) Milk Shake - R = 70% X2-- USM -C&P as NRL -place on left bottom -- DS -- TR
18.) Heart doodle-mirror -C&P as NRL- place on top left side-- move layer below tree layer- DS - dup. - R =80%- sharpen-- move it a little lower than 1st heart. TR
19.) Cherries -- R= 60% X 2 --USM -C&P as NRL Place on top left side and on the doodle-DS -TR
20.) Candle R = 50% & 80% -- USM-C&P as NRL- Place on bottom right -- DS --TR- dup. -R - 80% -- place it next to other one-- TR
21.) Butterfly - R - 50% X3 --USM-C&P as NRL-place on top right side -DS - TR - Free rotate left 30% --dup. R- 80% == place it in center --TR
22.) Butterfly2 - R = 50% - USM -C&P as NRL-- place on left side-DS -TR - dup. R = 80% sharpen -mirror - place it in the middle --TR
23.) With the bottom closed -- merge visible all layers. R+56% sharpen -= 504X504
24.) Paper 5 or 1 of your choice-- C&P as NRL- place above the bottom-- add a mask--delete mask and ungroup layers--crop opaque- 504 X 504.. open bottom layer and merge visible all layers..
25.) Add all copy right information -- your name and save as PNG.
Thank you for doing my tut, and if you get this kit, please let Betty know what you did with it, she really likes feedback
Thanks
Angie


Sunday, May 18, 2014

Love me not PTU

I wrote this tutorial any resemblance to others is purely coincidental.
This Beautiful Scrapkit is by Cari at Black Widows Creationz and can be found Here  
The Art is by Jamie Kidd and you can find it Here  
Mask by Trese tags & Tuts and you can find it Here  
I used # 275
MuRa Meisters  copies
Drop Shadow = DS. = 3,2,50,5 black
1 close-up / 1 
Lets begin
900 X 900
1.) EL. 2 -- copy and paste = C&P -- as New Raster Layer = NRL. -- place in center of canvas,With magic wand click on the inside of your frame-- selections - modify - expand - 15
2.) Paper 2 -- C&P as NRL -- place over frame -- invert on frame and delete on paper-- Select none -- move paper below frame- DS both frame and paper
3.) Tube -- C&P as NRL -- duplicate = Dup. = blur =gaussian- 6-- blend mode = hard light --opacity =90% Merge down--duplicate again and move this one below the frame- on the top remove any over hanging the frame --  and remove any that is over the bottom part of the frame --
DS -bottom tube, tag reference = TR--- then close bottom layer and Merge Visible all other layers--once happy--duplicate the frame again ; mirror -- resize = R = 90% to 95%
TR-- place the frames like mine.now merge these together-
4.) Close up tube--C&P as NRL -mirror and place on left side of canvas --dup.- blur-gaussian-6-Blend mode= screen -- opacity -80% -- Merge down --DS.. TR
5.) EL 12-C&P as NRL- resize to fit-- I used my raster deform tool,and just moved it over some -- TR --DS --frame
do not merge them,just leave it be.
6.) Now open a new canvas -- 900 X 900 - EL. 13 -C&P as NRL-R = 75% - unsharp mask-= USM- dup. close original-- now go to Mura meister -copies- with these settings -- wallpaper - (shrink) - random- wraparound- blend mode-- 20-50-50-0-0-/0/-/100/-0-0-/0/-0-30-0- ok ,
EX.1

C&P as NRL-place it on top--move layer above the bottom layer --R= 75%- sharpen- move to upper right side-- DS --TR
7.) EL 7.--C&P as NRL -place on bottom right -- DS-TR
8.) EL. 5-- R= 75% - sharpen-C&P as NRL- place on middle center -- DS --TR
9.) EL 32--C&P as NRL--place it on left side of hearts --DS--TR
10.) EL1--C&P as NRL---place in center -move layer below the heart layers--DS --TR
11.) EL 26 -- R - 60% --USM---C&P as NRL--place on left bottom -DS - TR
12.) EL 3 -- R=50% & 80% X 2--usm. -- C&P as NRL -- place on top left -- DS - TR
13.) EL 9 -R = 50% X2--USM --C&P as NRL-- place on bottom between the boots- DS--
14.) EL 6 - R = 50% X2 -- USM --C&P as NRL-- place on the right side of El. 9 --DS--TR
15.) EL 8 -- R = 50% X2 USM --C&P as NRL--place on the left side of middle chocolate -- DS --TR
16.) EL 27. -C&P as NRL-- place it between the 2 hearts -- mirror-- move layer below candy layer-- DS --TR
17.) EL 25 -R = 50% -- USM --C&P as NRL--place on upper right close to the top -- DS -TR
18.) EL. 24 --R= 50% & 80% USM --C&P as NRL--place on top right layer,next to the corset -- DS - TR
19.) EL. 11  R = 50% & 80% ---C&P as NRL--place on bottom,next to the left boot --DS--TR
20.) EL. 29 --C&P as NRL--place this on top left frame-- DS --TR
21.) Sparkle---C&P as NRL-- Place where you like, I placed mine close to the top--- No DS-- this is optional 
22.) With bottom still closed - Merge visible -- then R = 56% sharpen-- (optional { Xero - Porcelain -- default})
23.) Now add a paper of choice -- I used --P 5.. place it above the bottom now add a mask-- you can us any one you wish I used Trese's mask 275--the link is at the top...after adding the mask --you'll delete the mask and make it ungroup layers, once thats done, crop opaque --504 X 594 -- no open bottom layer and merge visible-
24.) Add ALL Copy Right info, and your name..
Thanks for checking out my tut.
hugs
Angie