Tuesday, December 30, 2014

Miss Santa PTU


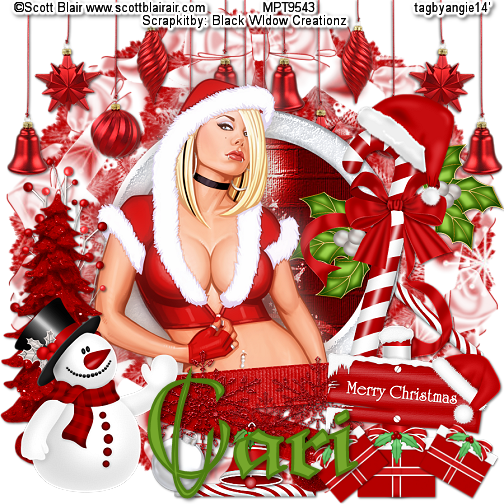
I wrote this tutorial, any resemblance to others is purely a coincidence. Please do not add this to any Website, Forum or Group without my permission. This Awesome tube is by Scott Blair and can be found Here
The awesome Christmas scrap-kit is by Cari at Black Widow Creations and can be found Here
Drop Shadow = DS - = 2,2,50,5 black
Resize = R
Let's Begin
900 X 900
1.) EL 38 - Copy and Paste = C&P - as New Raster Layer = NRL -place in center of canvas-
with magic wand click on the inside - selections- modify - expand 10
2.) P7-C&P as NRL-(or paper of your choice) invert on frame and delete on paper-- move paper below frame and DS both
3.) Tube - -C&P as NRL- place in front of frame -duplicate = dup. - on dup. - adjust - blur - Gaussian -6 -- Blend Mode = BM -soft light -- opacity = 100 = merge down-= MD
4.) EL 27 - C&P as NRL - place on bottom left - DS - Tag Reference = TR
5.) EL 29 - R = 80% Sharpen -- C&P as NRL - place on bottom right - DS -- TR
6.) EL 36 - C&P as NRL -  mirror -place on right center - move layer below tube layer--DS
7.) EL 4 -C&P as NRL - place on left bottom, move layer below snowman layer - DS - move up a little --TR
8.) EL 7-- C&P as NRL - place on top - move layer to right above bottom layer -- DS &TR -= duplicate = dup. - mirror  and MD
9.) EL 9 - R - 50 - adjust - sharpen - unsharp =USM -- C&P as NRL - place on bottom center -DS -move layer below the snowman layer -TR-dup. -R=80% - move down a little - dup. - R = 80% - move up a little --TR.
10.) EL 8 - R = 50% USM -- C&P as NRL - Place on bottom center--DS - free rotate left  28 - TR
11.) EL 25 - R = 50% & 80% - USM -C&P as NRL - place on bottom center - DS - free rotate - right 25% - TR
12.) EL 42 -R = 50% USM -- C&P as NRL -  place between both bulbs-DS & TR
13.) EL 41 - R=50% & 80% - USM-- C&P as NRL - Place on bottom center --move layer below the bell and bulb layers -- DS & TR - dup- free rotate 40% right- move layer below the candy cane and bow layer on the right center --TR
14.) EL 39 - R = 50% - USM-- C&P as NRL - place on bottom right-DS- TR-- dup. - R = 80% - free rotate left 40%- TR- dup. free rotate right 30% - TR
15.) EL 20 -- C&P as NRL - move layer below - tree on left -- DS & TR
16.) EL 30 - R = 50% USM-- C&P as NRL - place on top of candy cane--free rotate- right 45% TR
17.) EL 11- C&P as NRL - place right above the tube layer --DS & TR 
18.) close off the bottom layer -- now Resize all layers - 56 % --sharpen ( 504 X 504 )
19.) Paper 6 - or one of  your choice -- C&P as NRL - place right above the bottom layer -- add a mask ( one of your choice) delete mask and ungroup layers--  crop opaque -Open bottom layer -- M.V. all layers.
20.) Add all copy right info- name and save as PNG.
Thank you for looking.
Hugs
Angie


Tuesday, November 25, 2014

Thursday, November 20, 2014

Halloween Kitty PTU

I wrote this Tutorial, any resemblance to others is purely a coincidence. Please DO NOT add this to any Website, Forum or Group Without My permission.
The Halloween Kit is called "Halloween Kitty" By WhiteMyst Designs and can be found Here
The tubes I am using is by Brigid  Ashwood found Here
Filter = EC5 impact -- glass
My Supplies =  Here 
Filters - EC5 Impact 
Drop Shadow = DS = 2,2,50,5 black
Tubes - 2 tubes of choice
Let's get started
1.) Iron Fence -Copy and Paste = C&P --- as new raster layer = NRL - place in center of tag. - DS -  you might have to duplicate = Dup. and mirror, do this until your fence goes directly across your canvas.
2.) Creepy Tree--Some of these tubes are by "Belles Graphics " Please do not share them unless you have Becky's permission.-(to do so, would be not following her tou's )
 3.) Bat and Moon- C&P as NRL- place on upper left corner-- EC4 Gradient Glow--10 Yellow - DS - Tag Reference = TR
4.) Tombstone 2  = Resize = R. = 50% - Sharpen = Unsharp Mask= USM - C&P as NRL- place in center - DS & TR
5.) Tombstone - R = 50% X2 - USM - C&P as NRL- place on right side - move layer below fence layer - DS & TR
6.) Physco house - R= 54% & 80% X2 - USM - C&P as NRL- mirror and place on right side top. Move layer right above bottom layer - close off bottom layer.
7.) Grass - C&P as NRL- place on bottom - Dup. mirror and Merge Down = MD. move layer right below house--Dup. and Flip - bring down - MD - TR - continue making enough grass as you need..
8.) Click on bottom layer- add a NRL - flood fill -with 000000 (black)  rename sky
9.) Tube 1 = C&P as NRL- place on right side .-- Dup. Blur- Gaussian 6 --  Blend Mode = Hard Light - Opacity = 90% - MD & DS
10.) Witch Table - R = 50% - USM - C&P as NRL-place on grass - move layer below witch TR - Don't DS for now.
11.) With Ellipse tool - draw a circle - nice size one - Example in Supplies - when don Convert to raster layer-- with magic wand click on inside of circle
12.) Selection - modify - expand 6 - C&P as NRL- paper 1 ( or of your choice) invert on circle - delete on paper- Select none-
13.) If you want to animate- continue to do these steps. If not skip line #14
14.)  2nd Tube - C&P as NRL-  place under circle - and erase any sticking out of circle, try to center the picture where you can see almost all of the tube - DS & TR
15.) Still working on the Crystal Ball - (merge the 2 Down) with Ellipse tool - Material  (create on vector) line style - straight- width - 5 - anti - alias- checked. draw a decent circle around image - then go to- effects -EC5 Impact - glass - settings - Clear with reflection -now delete your elipse layer. Dup. Crystal Ball and then close- on duplicate you want to R = 15% USM - make it fit on the crystal ball- once done --Merge Down - MD
16.) Black cat - R = 50% USM.. - C&P as NRL - place on bottom left - DS - Dup. R = 80% - mirror - place on center fence - move layer below tree layer-- TR
17.)  Candy Bucket - R = 50% & 80%X2--USM -- C&P as NRL - Place it on center bottom.
18.) Cat on Pumpkin - R = 50% X2 - USM -  - C&P as NRL -Place it on right side bottom center--DS--TR- Dup. move this one left top side center - move layer below fence layer.
19.) Cauldron R= 50% USM - - C&P as NRL -move to left side - TR & DS
20.) Ghost - R = 50% USM - - C&P as NRL -place on right side- DS & TR - Dup. R = 50% - mirror - and move lower - TR
21.) Halloween lights - R = 50% USM - C&P as NRL - place on fence - from left to right - Dup.-move it over to other side ,ande next to other one. - Dup. one more time = 4 layers - merge these down to each other once happy crop to fit - opaque = 900X900--DS & TR
22.) Jack -C&P as NRL - place on left side - DS & TR
23.) Mummy - R = 50% & 80% X 2-C&P as NRL -DS - place on center bottom - move beklow crysatl ball layer - TR - mirror - Dup. R= 80% place this one on top center - TR
24.) Spider Web - R =50% USM-C&P as NRL -(DS) place on right side of house - TR = Dup. -R= 50% sharpen--place on bottom of tree - TR - Dup. and mirror - place it on fence.
25.) Witch - R = 50% USM - C&P as NRL -- place on bottom left side--DS & TR
26.) Vamptini - R = 50% X 2 - USM -C&P as NRL - place this one in front of center - DS & TR - Dup. - R = 80% place on crystal ball table in front --TR
27.) Scary Butterfly - R = 50% USM-C&P as NRL -place on top right - DS & TR -- free rotate - left 25 -- Dup. R =80% - mirror - place on bottom left.
28.) Sparkle - place on bottom - move layer right above sky - =Opacity 80%--MD 
29.)  Go ahead and Merge Vivible all layers below the CB layer -- Now R = 56% = 504 X 504 - Sharpen - now add all thr copy right info and then name-- if you do not wish to animate-delete the CB layer and Merge Visible and then save as PNG.
TO Animate keep going.
30.) let's get started....-on the layers below the CB layer rename them "Bottom" Now working on the top layer - with your Preset shape tool, and with colors to accent your tube, draw an arrow-the examples for all these should be in my files..
31.) DS and rename them R=Arrows  - convert to raster layer
32.) Now open CB and close - orginal-- open arrows on bottom
GO To Animation shop- copy as new rastrer layer and paste into AS.
Repeat this by opening the close area as well --TR
do this for a 3 frame tag-- when happy-change frame properties to 45-- view and when happy saves as 80%
thank you for looking at my finished tuts.
Hugs
Angie


Sunday, November 16, 2014

October

I am sorry I didn't get any tutorials done this month. Real life did a bang up job on this family.. My BF's Mom died, we had her funeral, which she was buried on the anniversary of our Dad's passing, even though it's been 4yr's. And then we had to pack up her 3 bedroom duplex apartment, and we only had from the 14th to the 31st to have all her stuff packed and gone. Even in Death there is no respect.
And in all this we had to leave town due to, an emergency for 4 days. Oh yeah, we also had to plan a Wedding of my BF to my brother, his 1st marriage.. took him 50 yr's , about time.. huh?
Ok so my next 2 tutorials are Halloween based, sorry- better late than never...
Can't wait till things get back to order.
hugs
Angie


Tuesday, September 30, 2014

Trick or Treat FTU

I wrote this Tutorial any resemblance to others is purely coincidence.. Please DO not add this to any Forum, Website or Group without my Permission.
This cute Kit is FTU, is By WhiteMyst Designs and can be found Here  
This cute little Tube is by Anniebel  at Here
My Stuff Here
Drop Shadow = DS= 2,2,50,5 black
Filters : MuRa's  Meister
You'll need 2 tubes - 1 face & 1 Full
Lets begin
900 X 900
1.) Candy Corn 3 - Resize = R - 56%X2-- Unsharp mask = USM- Copy and Paste = C&P - as New Raster Layer = NRL
Place in center-- use Mura meister - Encircle- Tile mode - behind - 12,50,50,0,100,-25,100,/0/100,0,0,/30/,0, ok--EX1
2.) With Magic Wand -Click in center of circle- Selection- Modify- Expand =5 - Paper 8- C&P as NRL - place in center- invert on frame layer and delete on paper-- Crop opaque- now move below frame - DS on both - Tag Reference = TR
3.) Large tube - C&P as NRL - place on top of paper and below frame - Duplicate = Dup. - Blur - Gaussian 6 - Blend Mode = BM -Multiply- opacity = 90% - when done Merge Down = MD - BS & TR
4.) Dup. Frame -With Raster Deform tool - on 2nd Candy frame - move it like EX 2- or if you can get your free rotate buttons work (mine was holding picked signs) Just remember you have to intersect the C-Layers --EX2
5.) Cat & Pumpkin -C&P as NRL -R=75% USM -place on bottom right side - DS & TR
6.) Cauldron - R  75% - USM -C&P as NRL -  Place on bottom left- DS - & TR
7.) Cupcake - R = 75% X3 - USM -C&P as NRL - place it on bottom next to kitty - DS & TR
8.) 2nd Tube- -C&P as NRL - Place on bottom left  -DS - move below cauldron layer-- TR - Dup.= R =75% - sharpen - now dup. this one - then blur -the same as before on #3 - MD-place this one on top right- DS- TR
9.) Ghost - R = 80 % - sharpen=-C&P as NRL - mirror- place on top left side -- DS & TR
10.) Jack - mirror--C&P as NRL -  place on upper right side - DS - TR
11.) Pumpkin bucket with candy -R = 60% X 2 --USM-C&P as NRL - place on bottom left - next to cauldron -- mirror--DS &TR
12.) Roses with Ribbon - -C&P as NRL - place on center left side-- DS & TR - move layer below 2 tube layer --
13.) Skull cherry - R = 60% X 2- USM---C&P as NRL - place on bottom right side -- DS - Dup. - 80 % place this below the 1st one.---Dup.- R = 80% - sharpen -mirror - place this one below the 2nd one- once they are done and you like your tag - then Merge Down = MD --  TR
14.) Vamptini- R =50% USM--C&P as NRL - place on center bottom - DS & TR
15.) Spooky Tree - R = 50% USM -C&P as NRL - place on top right side--DS &TR - move layer below the  candy cane layer.
16.) Tombstone-R=50% USM --C&P as NRL - place on top left -- DS -Dup. - mirror place this one - move layer below the tree layer -- TR
17.) Paper of choice - I did 3 papers - #1,#3,#7. -C&P as NRL - Add a nice mask to all 3 layers--delete mask and ungroup layers - do this for all mask layers - crop opaque if needed, to clean around the edges
18.) BOO WA- R = 50% USM -C&P as NRL - place on bottom of frame -- DS & TR
19.) Black Cat - R - 50% USM -C&P as NRL - place on bottom left side - DS & TR
20.) Bat - R= 50% USM -C&P as NRL - Place on center right side - DS & TR
21.) Close   All Candy
cane layers and above- on the rest below CC layers == Merge Visible = MV. - and rename Bottom - close this out
22.) Now open all layers above the candy corn - and MV- rename top- open candy cane 1 and top and bottom layers--
23.) R - 56% all layers = Sharpen on all layers
24.) ADD ALL Copy Right info== If you don't want to animate just open all layers- delete the 2nd candy cane - or you can leave it.. It will look like one of the other tags..Now add Name and save a PNG..
25.) To animate just go ahead and copy Merged - and place this one in animation shop as new animation
26.) Close CC 1 - and open CC2  - copy merged and paste after current frame
27.) In Animation shop== edit - animation properties - opaque
28.) Now go to Frame properties and change it if you think its to fast, just bring it up a little -- I left mine at 10
After viewing it and you like it, save as GIF.
I hope you injoyed this little tut.
Hugs
Angie
Here are 2 more tags ,using the same tut, but by making the as PNG's
 
 
1.)


2.)


Nerds Love PTU

I Wrote this Tutorial, any resemblance to others is purely coincidence. This awesome back to school kit is called
" Nerds Love " by Black Widow Creationz and can be found at her store Here 
The Tubes I am using are by Keith Garvey and you can find his Tubes Here
My Stuff Here   Just look for the name of the Tutorial. .   "Nerds Love"
Mask by VIX Here
Let's Begin
900 X 900
Drop Shadow = DS -= 2/2/50/5 black
Tubes - 2 of the same artist ( Full size and Head )
 
1.) EL. 33 -Copy and Paste = C&P as New Raster Layer  = NrL -With freehand selection tool -- point to point - add shift - feather = 0 - smooth = 0 - anti - alias checked.
Go around the center of phone - Selections - Modify - Expand X6
2.)  1st tube - C&P as NRL  - Resize = R - if needed - invert - delete - duplicate -blur- Gaussian = 6 --blend mode - hard light - opacity = 50% - Merge down - add a DS--Tag reference = TR
3.) Get colors from tube- and a nice font . I used Swanson st. 1, color = F9265A close out tube so you don't get distracted - write something on the phone -- I added mine like a text -- " ( Hey ___, Want to meet me after school to study
(self)_sure- K, Just call me at # ) add a DS  - close out the # -and the phone - Merge visable = MV = on all layers - when happy - R= 70%  -Phone and # - both layers - adjust - sharpen -= unsharp mask = USM - move to the right a bit -TR
4.) EL. 8 - C&P as NRL - place on left side - top - move layer below phone layer - DS
5.) 2nd tube - C&P as NRL - place on the left side--Duplicate tube - adjust -blur - Gaussian X6,- Blend Mode = soft light -opacity - 100%--merge down
6.) E17 -- C&P as NRL - place on bottom below 2nd tube - DS- duplicate it - move this layer below the other shoe layer - TR
7.) EL 19 -- C&P as NRL - place on the upper right side -- move layer to above bottom - DS &TR
8.) EL 39 - R = 60% - USM - C&P as NRL -  Place on top of Cell- phone-- DS & TR
9.) EL.36 -  - C&P as NRL -Place on the bottom right side -- DS & TR
10.) Open EL 7 - shift D - close original book. - working on book -EL. 35 - - C&P as NRL - R =60% X 2 & 80% - USM--place over the composition book - DS both - than MV . when done.- -
11.)  C&P as NRL -R = 50 % place it on top right corner -  free rotate - right 30% -- TR
 12.) EL. 37 - R = 50% & 80% X 3-- USM - C&P as NRL -place on locker - when done - DS-- free rotate left 30% - with Rastor Deform tool - "or Pick tool " holding the top right node- EX.1- and move it like EX.2-- DS & TR
13.) EL. 38 - R = 50% & 75 X2-- USM -- C&P as NRL - place on another locker (your choice) Free rotate - rotate right 30% with raster deform tool / pick tool - I only moved it sideways to fit on the locker.- DS & TR
14.) EL.16 -R = 50% USM-- C&P as NRL - place on bottom side of phone - DS & TR - duplicate - mirror - TR
15.) EL.12- R = 50 % USM - - C&P as NRL - place on bottom right side - DS & TR
16.) EL.2 - R = 50% USM -- C&P as NRL - place on bottom right - DS and place ;layer below the WA layer -- TR
17.) EL 26 - R 50% *& 80% X2 USM -- C&P as NRL -place this on middle bottom,  and on (WA--Study) DS & TR
18.)  EL. 3 - R = 50 % X2- USM - C&P as NRL -place on bottom right corner - DS & TR
19.) EL.4 - R = 50% & 80% USM - C&P as NRL -place on right side , bottom - DS & TR
20.) EL. 5 - R = 50% & 80 % USM- C&P as NRL -place on bottom right near the ruler - DS & TR
21.) EL.40 - 50 % USM - - C&P as NRL -place on bottom left DS  & TR
22.) EL. 15 - R = 50% USM- C&P as NRL - place on lower left side -- DS & TR- place it over the WA.
23.) EL. 27 -R 50% USM- C&P as NRL -place on bottom left side, move it below the shoe layer- DS & TR
24.) EL. 28 - R = 50% X2- USM - C&P as NRL -mirror - place on bottom right side - DS & TR
25.) EL. 34 - R = 50% USM- C&P as NRL -place on right side - DS & TR - place below WA.
26.)  EL. 9-- C&P as NRL - place on bottom center - bring layer to right below the laptop layer.. DS & TR
27.) Now if you are not going to animate- MV all layers- R= 56% - sharpen-- 
28.) Paper 4 and 8- I used 2 different mask - Vix 15 &19- delete mask on both and ungroup layers for both. - remember to crop opaque - 504 X 504
29) Add - all Copy rights and Name- save as PNG
30.) Let's animate- first off lets R = 56% sharpen and then Add All Copy right info, and name
Now we are going to MV layers -
A.) Close out - MD both WA and Lockers -rename lockers-
B.) Skate layer and Phone layer- Merge Down - Close Locker- phone and phone #
C.) You should now have 3 layers - EX 3
We are going to add the phone # in PSP and take it over to Animation shop - you can do this in Animation shop if you prefer, or do it the old fashion way .lol
D.) open text # - move it as close to the right side, you should have 940 (area code ) copy #,close this one and with freehand selection tool - point to point - add shift - feather-0 - smoothing - 0- anti alias checked
E.)  open duplicate - move the # a little - dup. close out the dup layer. use the freehand selection tool to erase the part not needed -  close this one
F.) Repeat Layer E - until you have the # going across the phone - I  had 14 frames in AS-- when your happy with your "tag" you can either open all layers and save it as "AS" and then bring it over to AS - and follow the instructions. I did mine the old fashion way, by opening each layer and Copy  Merged and paste in AS -
G.) when done Edit All frames - Animation properties - and opaque- and then go to Frame Properties - and change it to 30
View your animation, and when you get the way you wish.. save as GIF
Glad you checked out my Tutorial
Hugs
Angie
Here is the Non -animated one


Wednesday, September 17, 2014

May 2014 PTU

I wrote this Tutorial, any Resemblance to others is purely a coincidence. Please do NOT add this to any Website, Forum, or Group , without my permission.
This Beautiful kit is called " May" By WhiteMyst  Designs and you can find it Here 
The Beautiful tube is by Jennifer Janesko and you can find it at "CDO" Here  
My Supplies Here     
You will find, all the Example's and the animation
Drop Shadow = DS = 2,2,50,5 black
Lets Begin
900 X 900
1.) 28 - Copy and Paste = C&P as New Raster Layer - Nrl
and place in center of canvas. With Magic wand click inside the circle - Selection - modify - expand X 5 -  
2.) Paper 9 - C&P as Nrl - invert on frame - delete on paper - Select None = Sn -- move paper below frame - DS on both. Rename both - frame and shading
3.) 5 -- C&P as Nrl - place under frame-Resize = R = 50% & 80% - Sharpen - Unsharp Mask = Usm - rename = Village
4.) 12 - R = 80% - Usm - - C&P as Nrl - DS - place it only right side of frame - rename - Sun - Tag Reference = TR-
5.) Add Nrl - (only if you are animating) if not go to 6.  on your layer - go to your paint brush and find the fuzz soft - brush - EX. 1 - go around tag - size = 150 -step  =5 - density = 100 - Rotation = 8 - Opacity = 100 - Blend Mode = BM = Luminance Legacy -100 - opacity = 50% (X) hide fort now.
6.) 13 - R= 50% - Usm - - C&P as Nrl - place on left side - TR- DS
7.) 17 - R = 90% - Usm - - C&P as Nrl - place on left side--DS - TR - Duplicate = Dup. - move this layer below the cupcake layer --move layer up a little - TR
8.) 2 - R = 80% - Usm - - C&P as Nrl -place on bottom right-DS -
9.) Tube - - C&P as Nrl -Dup. - Adjust-Blur-Gaussian = 5 - BM = burn - Opacity = 100 - Merge Down = MD - DS - Place on left side of frame -TR
10.) 15 - R = 50% - Usm - - C&P as Nrl - place it on right side of cupcake - DS & TR
11.) 33 - C&P as Nrl - place above the night layer - rename - Stars -- DS -TR -- (X) hide this layer too.
12.) 39 - mirror - C&P as Nrl - place on upper center -- DS -- move layer below tube layer - TR
13.) 41 - R= 50% & 80% X3-Usm - - C&P as Nrl - place next to tea glass -- DS & TR
14.) 52 - R = 70% - Usm - - C&P as Nrl -mirror - place on bottom right -- DS & TR
15.) 49 - R = 40% - Usm - - C&P as Nrl -  place on bottom right - move layer below the bottom martini -- DS & TR
16.) 4 - R = 40% -Usm - - C&P as Nrl -place on bottom right side --next top glass -- DS & TR
17.) 51 - R = 40% -Usm - - C&P as Nrl -place it next to glass -- DS- check "the shadow on new layer box"  in  your drop shadow menu-EX. 2 free rotate - left 50% ---EX.3
18.) 50 - R = 40% -Usm - - C&P as Nrl -mirror - place on the present - DS & TR
19.) 47 - R = 70% X2 -Usm - - C&P as Nrl - place it on the side of the bird house - DS & TR
20) 30 - R = 40% - Usm - - C&P as Nrl - place on upper right side -- DS & TR -- Dup. R= 80% place this one wherever you wish.
21.) Close all layers but - shoe2 ,cupcake ,shoe1 ,margarita ,sweet tea ,milk ,other drink , present, shadow, male and female birds, when other layers are closed. Merge Visible = MV- all layers -- rename - front bottom - 
22.) close front - open tube, frame, fence, limb, MV.- rename frame - close
23.) open butterfly 1, butterfly 2, copy of butterfly 2, MV -rename - Top
24.) Make sure your layers can all be used, now resize all layers 56% = 504 X 504-- Usm all layers- if you don't want to animate-delete the night and stars layers-- open all other layers, and MV. then add all Copy right info and name save as PNG.
If you want to animate after resizing then you want to add all copy rights  then:  lets animate.
Open Animation Shop
1.) To color the lights,  in material palate you want to use this color for the lights (yel = ffff80 ) with magic wand - going in layers - click on the area you want to color - Add NRL and color when done - give it a name, I named mine VIA etc.. EX 5 - I did each building different, make sure you add a Nrl for each building's color --I ended with nine- close them out
2.) start Duplicating the sun and move it down, layer by layer, continue to dup. the sun and moving them down.
when done, work on moving the night layer up, so as the sun goes down the night comes up with the lighted buildings.
3.) when happy and if you caught up by now. I want you to close out each section-- Copy merged layers and working by layers- place 1st layer in animation shop as New animations. all other layers will be paste after the current layer-- when you are done, 10 frames -- edit = select all - copy and clicking on #10- add these after the current frame then reverse frames- you should have anywhere from 19 - 20
4.) now click on #7 - open "animation notes " make active layers 7-19 - propagate paste - and paste into  selected frame- reverse the animation
5.) Now clicking on frame 1 - select all - animation - animation properties - opaque- white and then click  on #1 - change frame properties
1- = 35
2-10 -= 50
11- = 75
12- = 80
13 & 14 - = 50
15 - 18 - = 35
19 - = 65-
You can always change your speed to how ever fast or slow you want
When done View and then save as GIF
Thank you for checking out my tut.
Hugs
Angie

Non animated tag.


Saturday, August 16, 2014

March PTU


I Wrote this Tutorial, any resemblance to others is Purely a coincidence.
Please do NOT add this to any Forum, Group or Website, without my permission.
The Art I am using is by PinUpToons and can be found Here  
This Beautiful Kit is by Betty at WhiteMyst Designs and can be found Here
Drop Shadow = DS = 2,2,50,5 black
Lets Begin
900 X 900
1.) Tube = copy and paste = C&P as new raster layer = NRL -- duplicate = Dup - Adjust - blur - Gaussian 6 - Blend Mode = BM = Multiply - Opacity = OP --90% - Merge Down = MD -- DS
2.) I 48 - C&P as NRL - place beneath the tube layer- DS - tag reference = TR
3.) I 49 -C&P as NRL - place beneath the city background - DS & TR - Dup. - mirror
4.) I 45 - C&P as NRL - place beneath the tube layer--DS - TR
5.) I 50 - Resize = R - 50% - C&P as NRL -sharpen - Unsharp mask = USM - place on top right - DS & TR
6.) I 11 - R = 50% - C&P as NRL -USM - place on lower right corner -- DS & TR
7.) I 10 - R = 50% - C&P as NRL -USM - place next to cupcake - DS & TR
8.) I 13 - R = 50% - C&P as NRL -USM - place top left side - mirror - DS & TR
9.) I 14 - C&P as NRL - put on left bottom - DS & TR
10.) I 2 - R = 50% -  C&P as NRL -USM - place center bottom - DS & TR - Dup. - R = 80% - sharpen - move next to other.
11.) I 30 - C&P as NRL -place on left side - move layer right above the star layer - DS - Dup. - Mirror & MD
12.) I 6 - R = 50% - C&P as NRL -USM - place on left bottom - 
13.) I 17 - C&P as NRL - place it on top center.
14.) after done I added the dates - DS & TR
15.)I 18 - C&P as NRL - place layer beneath fruit layers -- DS & TR
16.) I 24 - R = 50% & 80%-C&P as NRL -USM - place on center left -- free rotate - 25 - DS & TR - Dup. - mirror - move to lower right side.
17.) I 1 - R = 50% X 3--C&P as NRL -USM - place on bottom layer --DS & TR - Dup. R = 80% sharpen --mirror and place on top right.
18.) I 3 - R = 50% -C&P as NRL -USM - place on lower right side - DS & TR
19.) I 38 - R = 50% -C&P as NRL -USM - place on lower bottom center - move layer below cupcake - DS & TR
20.) Close bottom layer - and Merge Visible all other layers - R = 56% = 504 X 504
21.) P - 6 ( or one of your choice ) C&P as NRL - Add to bottom layer -- add mask of choice - delete mask -ungroup layers and then crop- opaque  
22.) Add all Copy Right info and then your Name - save as PNG.
Thank you for viewing my Tutorial,
hugs
Angie
Other view without banner


Thursday, August 14, 2014

Cappuccino Dream PTU

I wrote this Tutorial, any resemblance to others is purely a coincidence. Please do NOT add this to any Group, Website or Forum , without my permission.
This awesome Green and Brown colored kit is called 
" Cappuccino Dream " and is by Cari at Black Widow Creationz you can find it Here
The Tubes I am using are by PinUpToons and you can buy them Here
My Files Here
Tubes = 2-3 tubes of same artist, or 1 large or 1 full
Filters - Eye Candy 5 Inpact - glass
Drop Shadow = DS = 2,2,50,5 black
 Let's Begin
900 X 900
1.) EL. 1 - Copy & Paste = C&P -- As New Raster Layer = NRL-- place in center
2.) Paper 7- with Magic wand -- click in center of frame - selections - modify - expand 10 -- C&P paper as NRL - invert on frame and delete on paper - move paper below frame -- DS - both
3.) Frame 8 -Resize = R -75% --sharpen -- unsharp mask = USM-- C&P as NRL - place it above the other frame. (center) tag reference = TR
4.) With 1st tube -  - C&P as NRL - place it below the 2nd frame- and on top of paper -- TR -- Duplicate = Dup. -- Blur - Gaussian 6 = Blend Mode = BM = Multiply , Opacity = OP. =  90% - Merge Down = MD -- delete any part of tube going under the edge of frame -DS on tube
5.) With Lasso tool - go around the top frame -- EX. 1 -- select - modify -- expand 6 -
6.) on active frame - go to EC5 impact -- glass -- use these setting -- as seen in EX. 2-- TR
7.) Close out bottom layer and Merge visible = MV -- all layers and rename it frame -- move slightly to the top. TR.
8.) EL. 14 -- C&P as NRL - mirror and place on left side -- DS -- Dup. and flip -- put this on bottom layer.
9.) EL. 12 -R = 75% USM --- C&P as NRL - place on the bottom in front - DS --TR
10.) Tube #2--- C&P as NRL -place in front of coconuts-- Dup. - Gaussian blur 6 -- BM -  soft light - OP = 90% --MD--DS--TR
11.) EL 20 --- C&P as NRL - place on top left side -- move below frame -- DS & TR
12.) EL.27 - R = 60% & 80% --USM -- C&P as NRL -place on top right-- DS --TR -- Dup. - R = 80% = move down some - TR - Dup. & R = 80% again ( you can add more if you like, just dup and place them around.. you might even resize them as you go )
13.) EL. 26 -R = 50%-- USM -- C&P as NRL - place center bottom - move layer to right above bottom layer. DS & TR
14.) EL. 30 --R = 50% X 2 --USM -- C&P as NRL - place on left side in front of tube--Dup. -- R = 80% -- move next to coconut- I placed a few around -- TR.
15.) EL. 35 -- C&P as NRL -place right above the bottom layer.. DS & TR
16.) EL. 36 - - C&P as NRL -place this above the leaves -- DS & TR. -Dup. and move this right above the frame holder -- EX.3 & EX.4-- close your layers -- if you need to- now we are going to clean up the frame -- so it looks like it is sitting on the holder. TR
17.) EL. 7- R = 80% USM - C&P as NRL -place on bottom right- DS & TR
18.) EL. 29 - R = 50% X2 & 80%- USM - C&P as NRL -place in front of the 2nd tube-- Left bottom-DS -- (If you don't want to animate, do these following steps )
 19.) Close all Layers and Merge Visible -- R= 56% sharpen
20.) Paper of choice - I used PP3 -- add mask of choice -- delete mask -- ungroup layers -Crop-- opaque -504 X 504 -- Now open bottom layer and Merge Visible -- Add All Copy Right info, and Name then save as png.
If you want to animate do the following steps.
1.) To Animate-- go back to step # 18 -- with Lasso tool - go around the flame --ANI--EX.1 -6
2.) Dup. 3 X = 4 layers
3.) EC5- Nature - smoke- these settings-
small - steaming coffee
Basic - checked - wispy - smoke direction -99
Column Length- = 75
Puff size = 20.18
Expansion = 10
Waver = 37
Roughness = 60
Overall Opacity =  78
Random Seed = 1
Save
4.) on the rest of the layers -hit Random Seed - 1X for each layer
Once done select none, close off all layers except for #1. -
 Copy paste- paste into animation  shop as new raster layer - close original - continue to do this until you have all 4 layers done -- paste into animation shop - as NRL - when done check your frame settings and change them to = 30
now select all and go to animation properties- on frame 1 - edit - select all and go to - animation properties and add opaque - when happy save as Gif
Thank you for going this far. the Non-animated one is below
Hugs
Angie


Monday, July 28, 2014

Feburary PTU

I Wrote this Tutorial, any resemblance to others is purely a coincidence.. Please do not add this to any Website, Forum and Yahoo group, without my permission.
This Awesome kit is called " February " by Betty of WhiteMyst Designs and can be found Here
or Here
The art I am using is by Ismael Rac and can be found Here
Drop Shadow = DS = 2,2,50,5 black
Let's Begin
900 X 900
1.) Tree-- Resize = R - 80% sharpen-- copy and paste = C&P as New raster layer = NRL -place on left side-- DS & Tag reference = TR
2.) Spring Flower -- R = 80% X2 -- unsharp mask = USM--C&P as NRL-place on center right side of tag - DS
3.) Tube -C&P as NRL - place in center of tag -Duplicate = Dup. - blur -- Gaussian X6 -- Blend Mode = Soft light -- opacity = 100% - merge down = MD -- DS & TR
4.) Banner ribbon -C&P as NRL - place on bottom of tube, DS & TR - move tree layer to the top.
5.) Angel heart-R = 70% X2 --USM ---C&P as NRL - place on left bottom side -- DS -- TR
6.) Candle - -C&P as NRL - place on right side bottom.. DS
7.) Dozen Roses -- R - 70% X2 USM - -C&P as NRL - free rotate left 25 -- DS
8.) Corset -- R = 50% - USM --C&P as NRL - place beneath the heart - DS & TR
9.) Milk can -- R - 65 % USM - -C&P as NRL - place on bottom - DS -- TR
10.) Cupcake - R = 50% USM --C&P as NRL - place near milk--DS-TR
11.) Double bow-- R=50% USM--C&P as NRL -place on tree. DS & TR
12.) Flower 2 ---C&P as NRL -mirror - place right above bottom layer -- DS -- TR
13.) Flower 4 --C&P as NRL - place this one above flower 2 -- mirror and place on right side -- DS--TR
14.) Heart -- R= 50% X2 USM --C&P as NRL - place on tree -- DS & TR
15.) Gift Box ---C&P as NRL - place on bottom ,under corset -- DS & TR
16.) Tropical Drink-R = 50% USM --C&P as NRL - place on bottom -- DS & TR
17.) Flower - R = 50% X2 -- USM --C&P as NRL -place a few around..DS & TR
18.) Double Flower- R = 50% X2 - USM --C&P as NRL - place a few of these around also -- DS & TR
19.) Glitter butterfly - R = 50% USM ---C&P as NRL - DS -- place a few around, dup. R = 80% -- mirror -- TR
20.) With bottom layer closed --MV all layers --R = 56% = 504 X 504 -- sharpen -- add paper of choice- and we are going to use the other butterfly as a mask-- when happy -- crop opaque -- open up bottom layer and then MV all layers- sharpen
21.) Add all copy right info. when happy add Name and save as PNG..
Good luck, and I would really like to see what you have created with my tut.
hugs
Angie
 
Another tag using same Kit..


Friday, July 18, 2014

Victoria Sassy PTU ---- Forum size and Avatars


I wrote this Tutorial , any resemblance to others is purely a coincidence.
Please do NOT add this to any Forum, Group or Website without my consent. I am reasonable, just wanting to know where they are..lol
Ok You will need  1 tube of choice, I chose one from Ismael Rac and you can find his tubes Here
The Scrap kit I am using is by Cari at Black Widow Creationz and can be found Here
Filters-- Mura Meister -- copies
Drop Shadow = DS = 2, 2, 50, 5 black
Let's Begin
900 X 900
1.)Tube--Copy & Paste = C&P as New Raster Layer = NRL--place in center of canvas --Resize = R - 80% X2 -- sharpen
2.) MM copies with these settings --Circle - tile mode - behind - Spiral - 34 / 100 / 100 / 12 / 126 / 68 / 300 / 100 / 133 / 0 / 0 / 30 / 0
EX.1
3.) Crop --opaque- 600 X 250-- mirror
4.) EL. 7 - R = 50% & 80% X2 - Unsharp Mask = USM - C&P as NRL - place on left side -- DS & Tag Reference = TR
5.) EL. 4 - R = 50% X2 - USM -- C&P as NRL - place on bottom left -- DS --TR
6.) EL. 34 -R = 50% -- USM - C&P as NRL -- place on bottom left -- DS-- move layer below clock -- DS
7.) EL. 31 -R = 50% & 80% USM -C&P as NRL -- place layer below shoes -- DS -- TR -- duplicate = dup. mirror and place below shoes.
8.) EL. 30 - R =50% USM -- C&P as NRL --place center bottom --DS - TR -
9.) Tube - R = 80% X 2 -- USM - C&P as NRL - place on right side - dup. - blur - Gaussian 6 - Blend mode = soft light - opacity = 100 - merge down - DS - TR -- duplicate - mirror--opacity = 50% -- move layer to right above bottom layer.
10.) EL. 20 - R = 50% X2-- USM -C&P as NRL-- place behind tube - move layer above background-upper right side-DS -- TR
11.) EL. 25 -- R = 50% USM -C&P as NRL- place bottom center--DS & TR -- move layer below tube -- dup. - R = 80% move down--TR
12.) EL. 24 -- R = 50% X2 & 80% -- USM --C&P as NRL --place over stems of roses--DS.--merge down
13.) EL. 3 --R = 50% X2 - USM -C&P as NRL --- place upper right corner -- DS - TR
14.) EL. 11 -R = 50% X2 --USM --C&P as NRL -place top left -- DS --TR - dup. -R = 80% - move next to other -- TR
15.) Merge Visible all layers -- add all Copy Right info-- Save as PNG
16.)Now go to Edit--Undo CR info -   and use crop - opaque and 150 X 150, place on tag anywhere you want.. if you use any part of the tube, please add CR info.. If you use any part of tag that has the scrap kit in it, please add their Info.
Thank you for trying my tutorial. I would like to see how yours turned out.
Hugs
Angie