Tuesday, September 29, 2015

Woman Police PTU


 photo wpcari_zpsb2ka7nfa.png

I wrote this Tutorial, any resemblance to others is a coincidence. Please do NOT ad this to any Website, Group or Forum, without My permission.
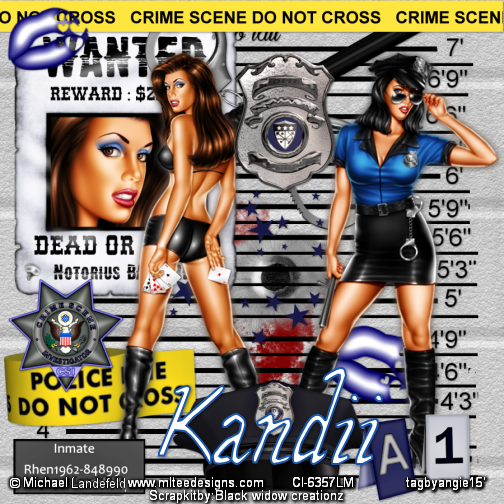
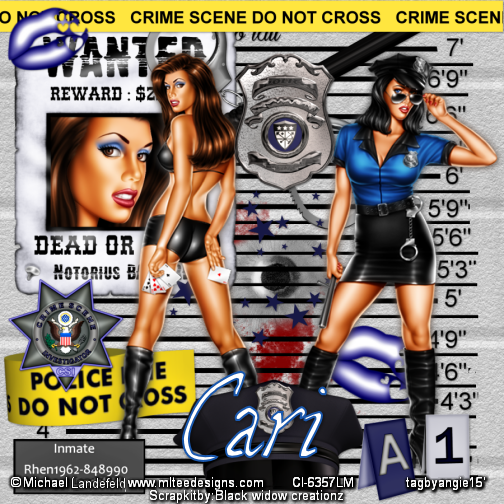
The tube I am using is by Michael Landefeld and can be found Here
The scrapkit is called "Woman Police" and is by Black Widow Creationz and you can find it Here
My Supplies Here
Just scroll down and you'll find it...lol
Drop Shadow = DS - 2,2,50,5 black
2 tubes
Let's Begin
900 X 900
1.) El. 29 - Copy and Paste = C&P as New Raster Layer = NRL- place in center of canvas - With Magic Wand click on the inside of frame - Mod- expand = 10
2.) Paper 5 or one of choice-C&P as NRL- invert and delete - select none = SN - move below frame - DS
3.) Close - up - C&P as NRL-Resize = R= (if needed) move her below frame, delete any that is coming out of the bottom, Duplicate = Dup.-adjust- blur- Gaussian 6- Blend Mode - Hard light -opacity 70% - Merge Down-  DS. close off bottom layer and Merge Visible - rename - Frame
4.) On the next 2 tubes, C&P as NRL- Place  one in front of the frame - and for both - dup. - blur- Gaussian 6- blend mode - soft light - opacity= 100 , merge down and DS , Tag Reference = TR
5.) El.10 -R= 80% - unsharp mask = USM - C&P as NRL- place center bottom - DS & TR
6.) El. 11 - C&P as NRL- place in center - DS - move layer below both tube layers - TR
7.) El. 2 = C&P as NRL-place in center -DS & TR
8.) P 5 -C&P as NRL- place below the bottom layer - 
9.) El. 4 - R = 80% X2 - USM - C&P as NRL- place bottom left - move below tube layer - DS
10.) El. 8 -C&P as NRL-place top center- DS - move layer below tube layers
11.) El. 7 -  C&P as NRL- place center - move layer above bullet hole - DS
12.) El. 26 - C&P as NRL- place bottom - move layer above the bottom layer.
13.) El. 9 - R = 70% &80% -USM - C&P as NRL- place center top - between both tubes - DS
14.) El. 24 - R = 50%--USM - C&P as NRL- place on bottom right corner.
15.) El. 23 - R = 60% - USM - C&P as NRL- place on left side - DS & TR
16.) El. 21 -R = 50% - USM - C&P as NRL- place on top and move layer below tube layers
17.) Use the Inmate plaque - I made, C&P as NRL-, I added my nickname of sorts- it can be optional - Resize if needed, DS & TR
18.) El. 27 - C&P as NRL- place on top - DS & TR
19.) El.14 - R = 50% & 80% - USM - C&P as NRL- place on bottom right - DS & TR - move below tube - free rotate right 20% - dup. R = 80% move to left corner - free rotate left 20% X 2
20.) Make sure all layers are open, Merge Visible -  R= 56% sharpen if needed. = 504 X 504
Add ALL Copy rights, and your Name.. Save as PNG
Thanks for following along.
Hugs
Angie


 photo wpkandii_zpsbxcurnmf.png


Tuesday, September 8, 2015

Fantasy Heart PTU

 photo Fantasy heartkandii_zpscnrjppgx.png
I wrote this tutorial, any resemblance to others is purely coincidental. Please do not add this to any Website, Group or Forum, without my permission.
This Beautiful scrapkit is called " Fantasy Heart" by Kandii Popz and can be found Here
The tubes I am using is by Sandra Lusquin and can be found Here
My Supplies Here
2 Tubes
Let's begin
Drop Shadow = DS - 2,2,50,5 black


900 X 900
1.) Fence - Resize=R-90% - sharpen - Copy & Paste = C&P - as A New Raster = NRL - and place in the center of tag. - Drop Shadow = DS
2.) Grass - R = 70% - Sharpen - C&P as NRL -place in front of fence.- DS - duplicate = dup.- mirror-add- NRL -grab your freehand selection tool - go around tag as in EX.1 - in your material palette on either color, use this one "00e8a9"  now with your flood fill tool, add your color to the New layer - EX.2- Select none = SN - move layer to right above bottom layer. - Tag Reference = TR- ( if you want your bottom a different color you can always change it.)
3.) With Raster deform tool, on top grab the center node as in EX.3 - push down - EX.4 and EX.5 - once done - grab the center node and pull up slightly - this is the grass effect. LOL -TR
4.) Log - R = 70% - sharpen -  - C&P as NRL -  place on bottom left side- DS & TR
5.) Greenage - - C&P as NRL - place left center , move below frame DS & TR
6.)  Cloud 1- C&P as NRL - place  on sky-  move to upper right. NO DS!
7.) Cloud 2 - R = 70% sharpen - C&P as NRL - place on left side - NO DS - Duplicate = Dup. - R = 80% - sharpen - move back a little - DS gives it a stormy look--TR
8.) Chair - R = 80% sharpen - C&P as NRL - move to the right side -DS & TR
9.) Bird Cage - R = 80% sharpen - C&P as NRL -place behind stump - DS & TR 
10.) Add tube  - R if needed - C&P as NRL- I placed my 1st one - on the left side- Dup. - Blur - Gaussian 6- blend mode = Soft light - merge down = MD - DS & TR
11.) Bird - R = 50% UnSharp Mask = USM - C&P as NRL -place on left side of cage - Dup. move this layer beneath the cage layer - on top erase all the leaves -    Then DS on the bottom.
12.) 2nd Tube -C&P as NRL - Dup -Blur -Gaussian 6 -Blend Mode = soft light -MD - DS & TR
13.) Clock - R = 50% & 80% X 2- USM -C&P as NRL- Place on chair - move layer below 2nd tube layer - DS & TR
14.) Dove - R = 50% & 80% - USM- C&P as NRL - place on sky (wherever you wish) DS
15.) Basket- R = 60% - USM - C&P as NRL - place on bottom right - DS & TR
16.) Flower 1 - R = 60% USM - C&P as NRL - place over basket- mirror (Dup. and close this is if you make a mistake )  - go around the handles as in EX.6- when done delete - Select none - open the other flower and place this between the tubes - DS - TR
17.) Flower 3 - R = 60% & 80% -USM - C&P as NRL - place on fence right side - DS - move layer below chair- on the right side - TR
18.) Watering Can - R = 60% & 80% USM - C&P as NRL - place in front of the flowers, center bottom - DS & TR
19.) Rose1- R = 60% & 80% X2 USM - C&P as NRL - place on bottom left side - DS & TR - Dup. - R = 80% - mirror - do this a few more times, I did mine 4 more times.
20.) Rose 2 - R = 60% X 2 & 80% USM - C&P as NRL - place this one on left side bottom between both faries.  place this layer below flower 2 - DS & TR - you can always Dup. and Resize them if you do.
21.) Leaves 2 - R = 60% USM - C&P as NRL - Place above grass layer - DS - Dup. Mirror - TR
22.) Butterfly 1 = R = 50% & 80% USM - C&P as NRL - place far right middle - Free Rotate - left 20 - DS & TR
23.) Butterfly 2 - R = 50% & 80% - USM - C&P as NRL - place on center of tag - DS & TR
24.) Sparkles 2 - C&P as NRL - mirror - place layer below tube 2 layer - NO -- DS - TR
25.) Now Merge flattened- In the material pallette - grab 2 colors from tube - Select all - float- defloat -                                             - modify - contract-invert - add NRL-flood fill with dark color - keep selected- inner bevel - 2-8-0-20-0-0-315- 50- 30 - Select none - merge again - and resize 56% = 504 X 504 
Add all Copy Rights and Name -save as PNG..
Thank you for keeping up with me.
Hugs
       Angie     


 photo Fantasy heartkandiipopz_zps7eg8dq4s.png


One for Cari
 photo Fantasy heartcarik_zpsejh61tcw.png