Saturday, October 24, 2015

Pin Up Girl PTU

 photo pinupgirlkandii_zpsgf6gd1ys.png
I Wrote this Tutorial, any Resemblance to others is purely a coincidence. Please DO NOT add this to any Website, Forum, or Group's, without my permission. Thanxs
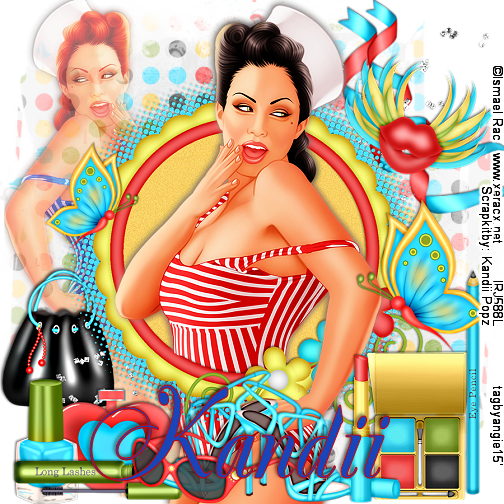
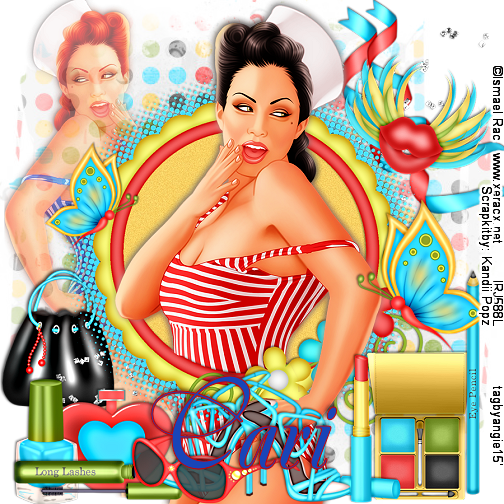
The Tube I chose is by Ismael Rac and you can find it Here
This Awesome girl kit is called " Pin Up Girl " made by Kandii Popz you can find her kits Here
Let's get started
Drop Shadow = DS = 2,2,50,5 black
900 X 900
1.) Frame 3 - Copy and Paste = C&P as New Raster Layer = NRL --  with Magic Wand - click on the inside of frame = Selections - modify - expand 6
2.) P2 - C&P as NRL- Place over the frame, Invert - Delete - Select None = SN - Move paper below frame and add DS to both.
3.) Tube - Resize = R = ( if needed ) - C&P as NRL- Duplicate = dup. - Blur - Gaussian 6 - blend mode - soft light - merge down- DS - dup. move this one below frame - on top tube - go around tube over hanging - and delete - SN -crop opaque - on both tube layers.. making sure it's 900 X 900 , DS Bottom tube -- close bottom layer and merge visible - rename frame
4.) Compact - R =75% - sharpen - - C&P as NRL-place on bottom right- DS & Tag Reference = TR
5.) Eye Pencil  - C&P as NRL- place on right side of compact - DS
6.) Lipstick - R = 75% - sharpen - - C&P as NRL-place on right side bottom, left of the compact - DS & TR
7.) Mascara - R = 75% Unsharp mask = USM - - C&P as NRL- place on left side of tag - DS & TR
8.) Nail Polish - R = 75% USM  - C&P as NRL- place on left side- an move layer below mascara- DS &TR-
9.) Perfume - R = 75% USM  - C&P as NRL- place next to nail polish - DS & TR
10.) Shoes - R = 75% USM  - C&P as NRL- place on bottom center of tag - DS & TR
11.) Sunnies -  - C&P as NRL- place in front of shoes - DS & TR
12.) Ribbon 2 - R = 75% X2 - sharpen- - C&P as NRL- place top right corner - DS & TR - free rotate - right 40 - dup. - R = 80% place above the other- Md and move layer below merged.
13.) Glitter  - C&P as NRL- Place on top of ribbon - move layer above ribbon - dup.- flip - mirror - ( DO NOT DS) - MD
14.) Flying lips - R =75% sharpen  - C&P as NRL- place on top of ribbon - free rotate - right 20 - DS & TR
15.) Bag - R = 70% USM - C&P as NRL- place on left side - DS & TR -move layer below the glitter layer.
16.) Butterfly- R = 70% USM  - C&P as NRL- mirror and place on center - right - DS & TR - dup. R = 70% mirror and place on left center - free rotate - right 20
17.) Now with Bottom layer still closed - Merge Visible all layers - R = 56% =504 X 504 -
P 7 (or one of your choice)  - C&P as NRL- place it above the bottom layer - now add a mask of choice - delete mask- ungroup layers- crop opaque - open bottom layer -MV. all layers
18.) Add all Copy Rights - name and save as png.
Thank you so much for keeping up with me.
Hugs to All
Angie


 photo pinupgirlcari_zps49zv49d5.png


Sunday, October 18, 2015

Falling into Halloween #2 PTU

 photo fallinfoheaven2betty_zpsroy4pkkm.png
I wrote this Tutorial, any Resemblance to others is purely coincidental. Please DO NOT add this to any Website, Group or Forum without my permission.
This cute Halloween kit is called " Falling into Halloween " by WhiteMyst Designs you can find it Here or  Here   
The tube is by Keith Garvey and you can get his tubes Here
Filter used = MuRa's Meister Copies
 
Drop Shadow - 2,2,50,5 black
2 Tubes - 1 close-up , and 1 regular
Let's Begin
900 X900
1.)  Close-up tube - Resize = R = 50% Copy and Paste = C&P as New Raster Layer = NRL ,   place in center - Duplicate = dup. - Blur - Gaussian - 6 -Blend Mode - multiply -  Opacity - 80% - Merge Down = MD.
2.) Go to MuRa's Meister- Copies -  This setting -
Encircle - Circle- Tile Mode - Behind - 10 / 55 / 55 / 0 / 100 / -25 / 100 / 0 / 100 / 0- / 0 / 30-     / 0 .                EX. photo EX_zpsbzmrsx32.png
 

.3.)  With Magic Wand - click inside frame - sel.-modify-expand - 12
4.) P 3 - or one of choice - C&P as NRL -  place over frame - invert -delete - Select None = SN
move paper below frame, and DS- both. - rename Frame
5.) 2nd Tube - R= 80% & 90% - sharpen -  - C&P as NRL - place her in center of frame - dup. - blur - Gaussian 6 - Blend mode - soft light - MD - DS & Tag Reference = TR - move her up a bit
6.) F 4 - - C&P as NRL - place below 2nd tube - DS & TR
7.) E 16 - R - 80% X2- unsharp mask - USM. -- C&P as NRL - place toward bottom of frame- DS- now move layer below frame - Dup. - mirror - dup.- flip- dup. - mirror- place these leaves around frame - TR - I merged mine to save on space
8.)  E 12 - R = 75% sharpen - - C&P as NRL - place on bottom left - DS & TR
9.) E 60 -- C&P as NRL - place on bottom right - DS & TR
10.) WA 1 - R = 60% - USM - - C&P as NRL - place on top left - free rotate - left 30 - DS & TR
11.) E 56 = - C&P as NRL - place on left side - DS & TR - move layer below the pumpkin kitty.
12.) E 57 - R = 60% - USM - - C&P as NRL - place next to pumpkitty-- DS & TR
13.) E 8 - R = 80 X 2 - USM - - C&P as NRL - place on right side next to snowman- DS
14,) E 58 -R = 60% USM - - C&P as NRL -place on left side DS & TR
15.) E 53 - - C&P as NRL - place center top- move layer below frame--DS & TR
16.) E 47 - R = 80% USM -- C&P as NRL - place top right - mirror - DS & TR
17.) E 37 - - C&P as NRL -right center -  move layer right below snowman - DS & TR
18.) E 2 - R= 80%-sharpen- C&P as NRL -place over bat-DS & TR
19.) E 4 - R=80% -sharpen-- C&P as NRL -place over cauldron - DS & TR
20.) E 43 - - C&P as NRL -place behind cauldron - DS & TR
21.) Close bottom layer - merge visible all layers -R = 56% sharpen -Paper 1 - - C&P as NRL -add a mask of choice - delete mask and ungroup layers- then crop opaque - open Bottom layer, an then Merge Visible
22.) Add all Copy Rights an Name.. save a PNG
Thanks for checking it out.
Angie

Sunday, October 4, 2015

Falling into Halloween PTU

 photo fallinintohalloween2betty_zpsopuwjvod.png

I wrote this Tutorial, any resemblance to others purely a coincidence. Please do not add this to any Website , Group or Forum, without my permission.
The Kit I am using today is by WhiteMyst Designs and is called "Falling into Halloween" you can buy this kit
Here    and   Here    
My Witch is one of my fav.'s of Elias Chatzoudis and you can buy his tubes Here
My Supplies Here
Drop Shadow = DS = 2, 2, 50, 5 blk
Animation shop = if making the animated tag.
Let's Begin
900 X 900
I should explain why I use such a large # for my canvas, simple so I have room to play around . Being 1 of 9 kids, it sure makes it easier for the larger size.. If you don't want to have it so big, don't worry, I always resize them, before I add the CR.'s
1.) E 52 - Copy and Paste = C&P as a New Raster Layer = NRL - place in center of canvas. on the right.
DS move this over a bit. Duplicate = Dup. - Mirror - have some space for your gate ( that's not there, lol ) Tag Reference = TR - when done close bottom layer and Merge Visible = MV - rename - Fence
2.) Grass - from my supplies -C&P as NRL - move this to the bottom of canvas -and right--now, dup.-flip, and move it down, until it merges - do this until you have enough grass,or until your happy, merge them =an move them under fence And merge together
3.) Sky - C&P as NRL -Place on top of grass- move this layer below grass and fence- leave it untended till later - rename sky
4.) House - Resize = R = 75% X2- unsharp mask = USM - C&P as NRL-place it on the right side above the fence, move layer below fence, TR - now go to - Adjust- Color Balance - Grey world Color balance - change Temperature # to 7000 - I also did this to the sky- to make it look stormy. DS
5.) Creepy Tree - R = 60% USM -C&P as NRL - place on top left - move layer below frame- DS & TR -( I dup. and pasted a few around - resizing some of them )
6.) E 55 - R = 75% & 80% - USM -C&P as NRL - place on bottom left side -- DS & TR
7.) E 51 - R = 50% & 80% - USM - C&P as NRL -place in front of Cart - DS & TR - dup. - R = 80% place it in front- if you wish you can add more- this is your tag.
8.) E 53 - R= 50% & 80% - USM-C&P as NRL -free rotate - 30 left - place on top of cart - move layer below cart- DS & TR
9.) E 56 - C&P as NRL - place on left side- move layer below the wheat layer - DS & TR
10.) E 45 -R = 50%- USM -C&P as NRL -place on right side - DS & TR - ( I duplicated -R = 50% more and place it in the Background.
11.) E 42 - R = 80% - sharpen - C&P as NRL - place on bottom pumpkin - DS & TR.
12.) E 47 -R = 80% - sharpen -C&P as NRL - place on top center - DS & TR - or wherever you wish.
13.) E 17 - R = 50% & 80% X2- USM- C&P as NRL- place on bottom left side- DS & TR
14.) E 19 - R = 50% USM - C&P as NRL -place on center bottom-DS & TR
15.)  Tube - R- if needed - C&P as NRL - place on right side- mirror - if you wish - DS & TR
16.) E 18 - R = 40% USM -C&P as NRL - place in center of both fences- DS & TR
17.) E 2 - R = 50% USM - C&P as NRL -place on top of house-- add a gradient glow -= 3, 25,40 with this color - EBFF64- DS & TR
18.) E 26 - R = 40% USM -C&P as NRL - place in front of witch = DS & TR-- if you wish you could mirror it.
19.) E 27 - R = 60% USM - C&P as NRL - move below tube layer - DS & TR
20.) E 28 - R = 30% USM- C&P as NRL -place on left side toward back - DS & TR
21.) E 32 - R = 40% USM - C&P as NRL - place on top of headstone - DS & TR - place layer below tube layer
22.) E 31 - E = 50% USM - C&P as NRL - place bottom center - DS & TR.
23.) E 40 - R = 50% USM - C&P as NRL - place on left- mirror - move layer below wheat - DS & TR.
24.) E 5 - R = 75% X 2 - USM - C&P as NRL - place on top left side- ( If you don't want to animate , then add DS)
25.) For Either tag- Go ahead and Resize all layers - 56% = 504 X 504 =  add all copy rights-if you don't want to animate- than Merge Visible all layers- add your name.. and save a PNG
Animate
1.) On ghost layer - rename Ghost- close off
2.) close off - the signpost all the way to bottom layers-- Merge Visible all other layers - rename- top
3.) Close off - top - open all other layers but Ghost and post. Merge visible - all - rename bottom-
4.) Duplicate the Ghost for as many letters as in your name- with all other ghost layers closed but for 1st one, with a nice font - I used ( Bloody  72 st.2 cd0000 (color) & DS) Add letters to each ghost-- After adding a letter and DS I would ,bring that letter below the one before, so they line up, you don't necessarily have to be straight be creative...
Once you are ready, make sure all ghost are closed but 1st letter, copy merged and go to Animation shop, and copy paste as new Animation - go back to PSP close that layer go to next letter - open it, copy merged and paste as after current frame, when you get all layers transferred, go back to PSP and open all letters, copy merged and paste this as the last frame = go to edit - select all - click on 1st frame - and then go to the last frame-  click on it, then go to frame properties I changed all to 50, except for the full name , I changed that to 75
When happy Save as GIF
Thank you for giving this a try.
Hugs
Angie


 photo fallinintohalloween2betty_zpskjfobh5p.gif