I wrote this Tutorial, any resemblance to others purely a coincidence. Please do not add this to any Website , Group or Forum, without my permission.
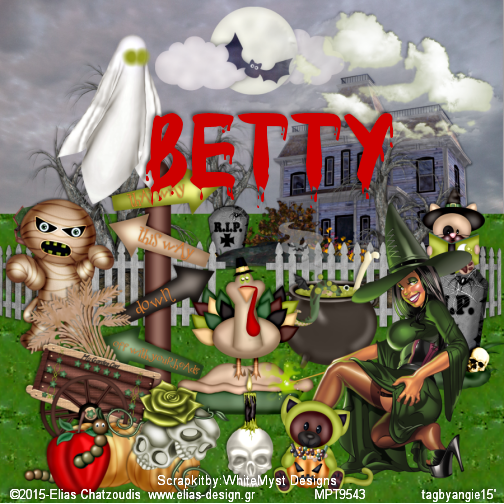
The Kit I am using today is by WhiteMyst Designs and is called "Falling into Halloween" you can buy this kit
My Witch is one of my fav.'s of Elias Chatzoudis and you can buy his tubes Here
My Supplies Here
Drop Shadow = DS = 2, 2, 50, 5 blk
Animation shop = if making the animated tag.
Let's Begin
900 X 900
I should explain why I use such a large # for my canvas, simple so I have room to play around . Being 1 of 9 kids, it sure makes it easier for the larger size.. If you don't want to have it so big, don't worry, I always resize them, before I add the CR.'s
1.) E 52 - Copy and Paste = C&P as a New Raster Layer = NRL - place in center of canvas. on the right.
DS move this over a bit. Duplicate = Dup. - Mirror - have some space for your gate ( that's not there, lol ) Tag Reference = TR - when done close bottom layer and Merge Visible = MV - rename - Fence
2.) Grass - from my supplies -C&P as NRL - move this to the bottom of canvas -and right--now, dup.-flip, and move it down, until it merges - do this until you have enough grass,or until your happy, merge them =an move them under fence And merge together
3.) Sky - C&P as NRL -Place on top of grass- move this layer below grass and fence- leave it untended till later - rename sky
4.) House - Resize = R = 75% X2- unsharp mask = USM - C&P as NRL-place it on the right side above the fence, move layer below fence, TR - now go to - Adjust- Color Balance - Grey world Color balance - change Temperature # to 7000 - I also did this to the sky- to make it look stormy. DS
5.) Creepy Tree - R = 60% USM -C&P as NRL - place on top left - move layer below frame- DS & TR -( I dup. and pasted a few around - resizing some of them )
6.) E 55 - R = 75% & 80% - USM -C&P as NRL - place on bottom left side -- DS & TR
7.) E 51 - R = 50% & 80% - USM - C&P as NRL -place in front of Cart - DS & TR - dup. - R = 80% place it in front- if you wish you can add more- this is your tag.
8.) E 53 - R= 50% & 80% - USM-C&P as NRL -free rotate - 30 left - place on top of cart - move layer below cart- DS & TR
9.) E 56 - C&P as NRL - place on left side- move layer below the wheat layer - DS & TR
10.) E 45 -R = 50%- USM -C&P as NRL -place on right side - DS & TR - ( I duplicated -R = 50% more and place it in the Background.
11.) E 42 - R = 80% - sharpen - C&P as NRL - place on bottom pumpkin - DS & TR.
12.) E 47 -R = 80% - sharpen -C&P as NRL - place on top center - DS & TR - or wherever you wish.
13.) E 17 - R = 50% & 80% X2- USM- C&P as NRL- place on bottom left side- DS & TR
14.) E 19 - R = 50% USM - C&P as NRL -place on center bottom-DS & TR
15.) Tube - R- if needed - C&P as NRL - place on right side- mirror - if you wish - DS & TR
16.) E 18 - R = 40% USM -C&P as NRL - place in center of both fences- DS & TR
17.) E 2 - R = 50% USM - C&P as NRL -place on top of house-- add a gradient glow -= 3, 25,40 with this color - EBFF64- DS & TR
18.) E 26 - R = 40% USM -C&P as NRL - place in front of witch = DS & TR-- if you wish you could mirror it.
19.) E 27 - R = 60% USM - C&P as NRL - move below tube layer - DS & TR
20.) E 28 - R = 30% USM- C&P as NRL -place on left side toward back - DS & TR
21.) E 32 - R = 40% USM - C&P as NRL - place on top of headstone - DS & TR - place layer below tube layer
22.) E 31 - E = 50% USM - C&P as NRL - place bottom center - DS & TR.
23.) E 40 - R = 50% USM - C&P as NRL - place on left- mirror - move layer below wheat - DS & TR.
24.) E 5 - R = 75% X 2 - USM - C&P as NRL - place on top left side- ( If you don't want to animate , then add DS)
25.) For Either tag- Go ahead and Resize all layers - 56% = 504 X 504 = add all copy rights-if you don't want to animate- than Merge Visible all layers- add your name.. and save a PNG
Animate
1.) On ghost layer - rename Ghost- close off
2.) close off - the signpost all the way to bottom layers-- Merge Visible all other layers - rename- top
3.) Close off - top - open all other layers but Ghost and post. Merge visible - all - rename bottom-
4.) Duplicate the Ghost for as many letters as in your name- with all other ghost layers closed but for 1st one, with a nice font - I used ( Bloody 72 st.2 cd0000 (color) & DS) Add letters to each ghost-- After adding a letter and DS I would ,bring that letter below the one before, so they line up, you don't necessarily have to be straight be creative...
Once you are ready, make sure all ghost are closed but 1st letter, copy merged and go to Animation shop, and copy paste as new Animation - go back to PSP close that layer go to next letter - open it, copy merged and paste as after current frame, when you get all layers transferred, go back to PSP and open all letters, copy merged and paste this as the last frame = go to edit - select all - click on 1st frame - and then go to the last frame- click on it, then go to frame properties I changed all to 50, except for the full name , I changed that to 75
When happy Save as GIF
Thank you for giving this a try.
Hugs
Angie
No comments:
Post a Comment