I wrote this Tutorial, any resemblance to others is purely a coincidence.
Please do NOT add this to any Forums, Groups, or Website.
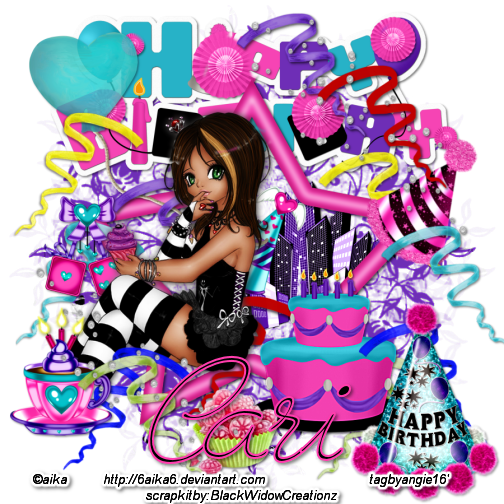
The cute little Tube I'm using is FTU and by AIKA here is where you can find her art Here
The Kit is called " My Bday Party " By Black Widow Creationz Here
900 X 900
Let's Begin
1.) EL. 32 - Copy and Paste = C&P - As New Raster Layer = NRL - place in center of canvas - DS
2.) Tube -C&P as NRL - Resize = R - if needed - place tube on star so it looks like, duplicate = dup. - blur - Gaussian - 6 - blend mode = soft light - opacity = 100 - merge down = md, - DS
3.) EL. 3 - R= 80% X 2 - sharpen more - -C&P as NRL - place on right corner of star - DS - tag reference = TR
4.) EL. 12 - C&P as NRL - R= 80% X3-USM- place on left side in front of Tube -- DS and Tag Reference =TR
5.) EL. 13 - R= 75% X 3 USM - C&P as NRL - Place in center- move layer below frame layer - DS & TR
6.) EL. 15 -- C&P as NRL - Place on left side - move layer below tube - DS & TR
7.) EL.10 - C&P as NRL - Place on top - DS - move layer below frame- dup. - move this to top of frame, with eraser go around saying- wherever the other elements are - TR- & DS bottom layer
8.) EL. 21 -R =65% & 80% USM - C&P as NRL - place on corner of star - free rotate - right - 25% - DS & TR
9.) EL. 26 - R=80% X3 -USM- C&P as NRL - place on bottom center - DS
10.) EL. 35 - - C&P as new Image - dup. it as many different colors you wish - close all but the 2nd one - while it's open - selection float - de-float - go to = adjust - color balance - manual color correction -click on the source tag which you need to change to your color on 1st one. = F21E47-- on the duplicate - find a color of your choice, I'm using Purple - 6E2EDb6 H/184... S/152 (with all colors its better if you check your Hue and Saturation and then colorize ) as you can see from my examples found in my supplies. I did these colors
A.) Light Blue - 27B2C7 - H/ 132 - S/171
B.) Dark Blue = 0000FF- H/169 - S/255
C.) Light Green = A2CD45 - H/55 - S/ 147
D.) Yellow = FFFF40 - H/42 - S/255
E.) Red = 000000 - H/ 255 - S/255
When your doing your colors, if you get done, select none, and resize all layers - 65% X 2 USM - - C&P as NRL -- Add all over the place - DS & TR
11.) EL. 37 -R=50% USM - C&P as NRL - place below frame layer - and below all others beneath the frame -DS & TR
12.) EL.11 - R = 50% USM - - C&P as NRL -place on frame , left side - move layer below tube layer-- DS & TR
13.) EL. 27) R = 75% USM - C&P as NRL -Place on bottom right - DS & TR
14.) EL. 20 - C&P as NRL -place on top right -- DS - dup. mirror -flip TR- close off bottom- Merge Visible all layers - R =56% = 504 X504
15.) Paper 1 - ( or one of your choice) - C&P as NRL - Add a mask of choice - delete mask - yes - ungroup layers, then crop it- Merge Visible all layers - - Then add all Copy rights and name- save as PNG
Thanks for sticking with me..
Hugs
Angie

No comments:
Post a Comment